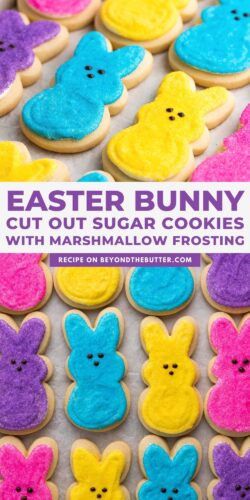
Made with my super soft cut-out sugar cookies recipe, these Easter Bunny Cut Out Sugar Cookies are a nod to the classic Peeps marshmallow candy! They have a buttery soft, tender inside with a slightly crisp outside, topped with marshmallow buttercream frosting, sparkling sugar, and chocolate piped-on dots for their eyes and nose.

With Easter right around the corner, I can’t think of a better time to share these Easter bunny sugar cookies! The cookie recipe is straight from my Super Soft Cut Out Sugar Cookies recipe. They have a buttery, soft, tender inside and a slightly crisp outside.
The marshmallow buttercream frosting is adapted from my Small Batch Gingerbread Cupcakes recipe, with a little added heavy cream to make piping the frosting onto the cookies easier. These sugar cookies are coated in the classic Peep sanding sugar colors (mine are from Wilton) and then topped with a pair of chocolate dots for eyes and a chocolate nose using melted dark chocolate.
These sugar cookies hold their shape so well, won’t spread, and taste absolutely wonderful! I hope you enjoy them! And if you like these, check out my Chocolate Cut Out Sugar Cookies for a chocolate Easter bunny cookie version!

Table of Contents
Ingredients
The following ingredients are used to make this bunny cut-out sugar cookies recipe. Items noted in the bulleted list below are key ingredients that need a bit more explanation.

- Almond and Vanilla Extracts. Adding this and the vanilla extract will give the cookie dough that classic sugar cookie flavor! Don’t skip it.
- Cream of Tartar and Powdered Sugar. These two key ingredients give these cutout sugar cookies that soft, tender texture.
- Marshmallow Creme. You can also use marshmallow fluff.
- Sparkling or Sanding Sugars. I used classic colors like pink, blue, purple, and yellow, but you can use whatever you like or have on hand.
How to Make the Recipe
Below is a brief overview of how to make these easy bunny cut out sugar cookies. For the full printable recipe, which can be made using US customary or metric measurements, visit the recipe card below.

Step 1. Make the cutout sugar cookie dough. Start by whisking the all-purpose flour, baking soda, and cream of tartar together. In a separate bowl, beat the unsalted butter until smooth, then add in the powdered sugar. Add in the egg and extracts (Image 1). On low speed, add the whisked dry ingredients to the wet ingredients, mixing until fully incorporated (Image 2).

Step 2. Divide, then roll out the cookie dough. Divide the cookie dough into two sections (Image 3). Roll out each section of cookie dough into 1/4-inch thick slabs on a lightly floured sheet of wax paper (or parchment works, too) (Image 4). Chill for a minimum of one hour.
Quick Tip: You can make the easter bunny cutout sugar cookies in advance of decorating them. If making them a day or two in advance, you can keep them in a well-sealed container at room temperature with a slice of bread (to keep them soft).

Step 3. Cut out the bunny cookies and bake. Flour the bunny cookie cutter, then cut out the cookies (Image 5), placing them 1 1/2″ apart on the cookie sheet. Bake for 7-8 minutes at 375ºF or until the edges are a light golden brown. Let them cool on the baking sheet for about 5 minutes before transferring to a cooling rack (Image 6).
Quick Tip: If you’re only using sanding sugars or sprinkles, add them right before you bake the cookies.

Step 4. Make the marshmallow buttercream frosting. Begin by beating the unsalted butter and marshmallow creme together until well blended. Add the powdered sugar and heavy cream, mixing until fully combined.
Quick Tip: The marshmallow buttercream frosting can be made in advance. Keep it in a tightly sealed container in the fridge. Let it come to room temperature and remix with a hand or stand mixer before using.

Step 5. Decorate the cookies. Pipe the marshmallow buttercream frosting onto the cookie, then spread and smooth it out using a small offset spatula (Image 9). Coat the frosted cookie with sanding sugar (essentially, you face-plant the frosted cookie into the sanding sugar). Pipe on the chocolate eyes and nose (Image 10). I recommend doing a test of piping the eyes and nose first on parchment paper or plate.
Decorating Variations
Below are a few alternate ways to decorate your bunny cut-out cookies!
- Royal Icing. Applied after the cookies have been baked and cooled. Royal icing requires additional tools (see my Christmas Cut Out Sugar Cookies recipe) and will take some time to decorate. This is good for beginner bakers through advance.
- Vanilla Buttercream Frosting. Applied after the cookies have been baked and cooled. You can use this recipe instead of the marshmallow buttercream frosting if you prefer. You can find this frosting recipe with my Super Soft Chocolate Cut Out Sugar Cookies recipe.
- Sanding Sugar or Sprinkles. Applied before you bake the cookies. This option is less messy and good if you’d rather skip the frosting and royal icing. These cut out sugar cookies taste wonderful on their own, so adding just a little sanding sugar or sprinkles would be perfect.

Helpful Tips
To make the perfect cut out sugar cookies, check out the following helpful tips!
- Room temperature ingredients. Ingredients like your unsalted butter and egg, will blend with the other ingredients a lot easier when they are at room temperature.
- Use parchment paper. You can use plastic wrap to roll out the dough, but I prefer parchment paper because you can reuse it later to bake your sugar cookies.
- Divide then roll. Once the dough is made, shape it into one big ball, then divide it in half. Roll each half out onto a lightly floured parchment paper. I also place a silicone baking mat underneath to keep the paper from sliding all around. You will stack the second parchment sheet of rolled out cookie dough on top of the other.
- Chilled dough is the best. It should be chilled for at least 1 hour. Overnight is even better, or you can chill it for about half the time in the freezer.
- Flour the cookie cutter. Dipping your bunny cookie cutter every 2-3 cookies in some flour will help release the cookies easier.
- Don’t overbake the bunny cookies. The recommended baking time for these super soft cut-out sugar cookies is 7-8 minutes. You want the edges and underside of the cookies to be a light golden brown color. My preference is to bake them for 7 minutes.
- Use an oven thermometer. Get yourself an oven thermometer to make sure your oven is heating to the correct temperature!
- Cool the cut out sugar cookies completely. Make sure the cookies have cooled before you add the marshmallow buttercream frosting.
Cut Out Sugar Cookie Tools
Here are the tools you’ll need to decorate the Easter bunny cut out sugar cookies:
- Cookie Cutter. My bunny cookie cutter is from Ann Clark and is 4 inches tall.
- Sanding Sugars. I used the Wilton brand of sanding sugars that come in bright blue, yellow, pink, purple, and many other colors.
- Piping Bags. Needed for the marshmallow buttercream frosting and (optionally) for the melted chocolate. There are different types of plastic piping bags out there as well as reuseable piping bags. Use what feels best in your hands.
- Decorating Tips and Bottle. I used the Wilton no. 10 decorating tip for the marshmallow buttercream frosting and a Wilton candy making decorating bottle for the melted chocolate. You could also use the Wilton no. 4 decorating tip as a substitute for the chocolate, but I found the bottle to be easier. The decorating tips can be found in the Wilton Master Decorating Tip Set which I love!
- Small Offset spatula. Perfect for smoothing out the marshmallow buttercream frosting on the cookies.
- Decorating Coupler. This is what is used to help attach the decorating tips with the piping bags. Couplers can be purchased in the tip set I mention above or separately.
- Large pint glass. I use this for filling my frosting piping bag. To use, place the piping bag in the glass, draping the bag over the sides.

Recipe FAQs
I used a Wilton 10 decorating tip for the marshmallow buttercream frosting and a Wilton candy-making decorating bottle to pipe on the chocolate eyes and noses. You can also use a Wilton 4 decorating tip for the chocolate, but I found the decorating bottle easier to use.
Try adding a little more flour to the dough—a tablespoon at a time—until the stickiness is gone.
I prefer to roll my sugar cookies out to a 1/4-inch thickness. If you want to roll them out thinner, pay attention to the time you bake them because they’ll bake faster than thicker cookies.
My bunny cookie cutter is by Ann Clark. It’s 4 inches in height.
Sometimes, the more you handle the cookie dough, air bubbles can appear in the cookie during baking. If this happens, remove them from the oven and gently tap the tops of them with a spatula/turner.
More Easter Treats to Enjoy!


If you tried this Easter Bunny Cut Out Sugar Cookies Recipe or any other recipe on my website, please leave a 🌟 star rating and let me know what you thought in the 📝 comments below. Thanks for visiting!
Easter Bunny Sugar Cookies

Equipment
- Reuseable Piping Bag or you can use a Ziploc bag
- Decorating Tip or bottle
- Decorating Coupler
Ingredients
easter bunny cut out sugar cookies
- 2 ⅔ cups All-Purpose Flour
- 1 tsp Baking Soda
- 1 tsp Cream of Tartar
- 1 cup Unsalted Butter, room temperature
- 1 cup Sifted Powdered Sugar
- 1 Large Egg, room temperature
- 1 tsp Vanilla Extract
- 1/2 tsp Almond Extract
marshmallow buttercream frosting
- 1/2 cup Unsalted Butter, room temperature
- 3 1/2 oz Marshmallow Creme
- 1 1/4 cup Powdered Sugar
- 2 tbsp Heavy Cream
decorations
- Blue Sanding Sugar
- Pink Sanding Sugar
- Yellow Sanding Sugar
- Purple Sanding Sugar
- 3 oz Dark Chocolate Chips, melted, for the eyes and nose
- 2 tsp Coconut Oil, gets melted with the chocolate
Instructions
Easter bunny cut out sugar cookies
- In a medium bowl, whisk together the all-purpose flour, baking soda, and cream of tartar. Set to the side.2 ⅔ cups All-Purpose Flour, 1 tsp Baking Soda, 1 tsp Cream of Tartar
- Using your hand mixer or stand mixer fitted with a paddle attachment, beat the unsalted butter on medium-high speed until smooth and creamy.1 cup Unsalted Butter
- Turn off your mixer and add in the powdered sugar. Blend it together with the butter over low speed until it's almost combined.1 cup Sifted Powdered Sugar
- Scrape down the sides of the bowl, then on medium-high speed, add in the egg, vanilla extract, and almond extract until well blended.1 Large Egg, 1 tsp Vanilla Extract, 1/2 tsp Almond Extract
- Switching the mixer speed low, gradually add in the whisked dry mixture until fully incorporated. The cookie dough should start to form a ball and pull away from the sides.
- Transfer the sugar cookie dough onto a clean work surface, then shape it into a ball and divide it into 2 sections. Roll out the first section of cookie dough to a 1/4 inch thickness slab on a lightly floured sheet of parchment paper (or wax paper). Place onto a baking sheet or jelly roll pan. Repeat with the second section, placing it on top of the first layer. Refrigerate the cookie dough slabs for a minimum of 1 hour.
- After chilling is complete, adjust your oven rack to the 2nd level position (just above center) and preheat your oven to 375ºF. Line 2 cookie sheets with parchment paper and set aside.
- Flour your bunny cookie cutter then cut out your cookies. Place each bunny cookie 1 1/2" apart on the cookie sheet. If you're only using sanding sugar or sprinkles, now is the time to add them. Place any cookies not yet baked into the refrigerator or freezer to chill while the first set bakes.
- Bake the cookies for 7-8 minutes at 375ºF or until the edges are a light golden brown. Allow them to cool on the cookie sheet for about 5 minutes before transferring them with a spatula (or server) to a wire cooling rack. Let them cool completely before decorating them with the royal icing. If baking the cookies in advance, keep them stored in an airtight container with a slice of bread for up to 3 days. You can also freeze baked cookies for up to 3 months. Let them cool completely before placing into a well-sealed container or freezer bag.
marshmallow buttercream frosting
- Using your hand mixer or a stand mixer fitted with the paddle attachment beat the unsalted butter and marshmallow creme together until well blended and no chunks of butter appear in the mixture.1/2 cup Unsalted Butter, 3 1/2 oz Marshmallow Creme
- With the mixer stopped, add in the powdered sugar. Mix together on low speed until the frosting begins to form, then add in the heavy cream and mix until fully incorporated. It's best to start with just 1 tablespoon of heavy cream and see if this is the consistency you prefer. For piping the frosting onto the bunnies, I found using 2 tablespoons to be the best.1 1/4 cup Powdered Sugar, 2 tbsp Heavy Cream
decorating the Easter bunny cookies
- Melt the dark chocolate and coconut oil in a microwave safe measuring glass for 1 minute at full power. Stir, then heat once more for 30-45 seconds at full power. Stir, then transfer the melted chocolate to a Wilton candy making decorating bottle or a small piping bag fitted with a coupler and a Wilton 4 decorating tip. Set to the side.3 oz Dark Chocolate Chips, 2 tsp Coconut Oil
- Fill a large piping bag fitted with a coupler and Wilton 10 decorating tip with the marshmallow buttercream frosting. Outline the bunny cookies with the frosting then continue to pipe along the inside to fill them in.
- Smooth out the frosting with a small offset spatula, then coat the frosted cookie in either the blue, pink, yellow, or purple sanding sugar. Repeat until all the cookies have been decorated, then pipe on the chocolate eyes and nose on each bunny cookie. See notes for alternative ways to decorate your bunny cookies.Blue Sanding Sugar, Pink Sanding Sugar, Yellow Sanding Sugar, Purple Sanding Sugar
cookie storage
- Cookies can be stored in a well-sealed food container with a slice of bread to keep them nice and soft for up to 10 days. It's best to separate each layer of cookies with either parchment paper or wax paper. The cookies can also be kept in individual cookie bags that are sealed. Already baked and iced cookies can be stored for up to 3 months when placed and sealed into individual bags.
Notes
Nutrition
Nutritional information provided above is an estimate only and will vary based on specific ingredients used. See Nutritional Disclaimer for more info.


My dough is a little dry what did I do wrong
Hi! It’s possible you added too much flour to the dough.
Does the marshmallow buttercream frosting slightly harden or does it always stay soft?
Hi Anita! great question and I apologize for the delayed response as your question went into my spam filter. To answer your question, it will develop a slight crust to the outside, but not harden (like royal icing will). I recommend using a layer of wax or parchment paper in between the cookies.
Hi not sure how much marshmallow cream is in 3.5oz I could only find the bigger container. I’m guessing a little more than a cup. I’m going to try the recipe this weekend!
Hi Emily! Yes, 3.5 oz is a little more than a cup. If you have the 7 oz container, just take half out. If you have a scale and want to weigh it it’s 99 grams. I hope you love them! If you have anymore questions, feel free to ask. Happy Easter!
Did you dye the white sparkling sugar you have linked in the recipe or did you buy individual colors? What brand did you use? Can’t wait to give these a try!!
Hi! Great question. No, I used the Wilton brand of sanding sugars for decorating, which you can find pretty much anywhere. I found them in bright blue, purple, pink, and yellow (but they have other colors too). I forgot to link them, so I just added them to the cookie tools section. Hope you enjoy them as much as I do!