
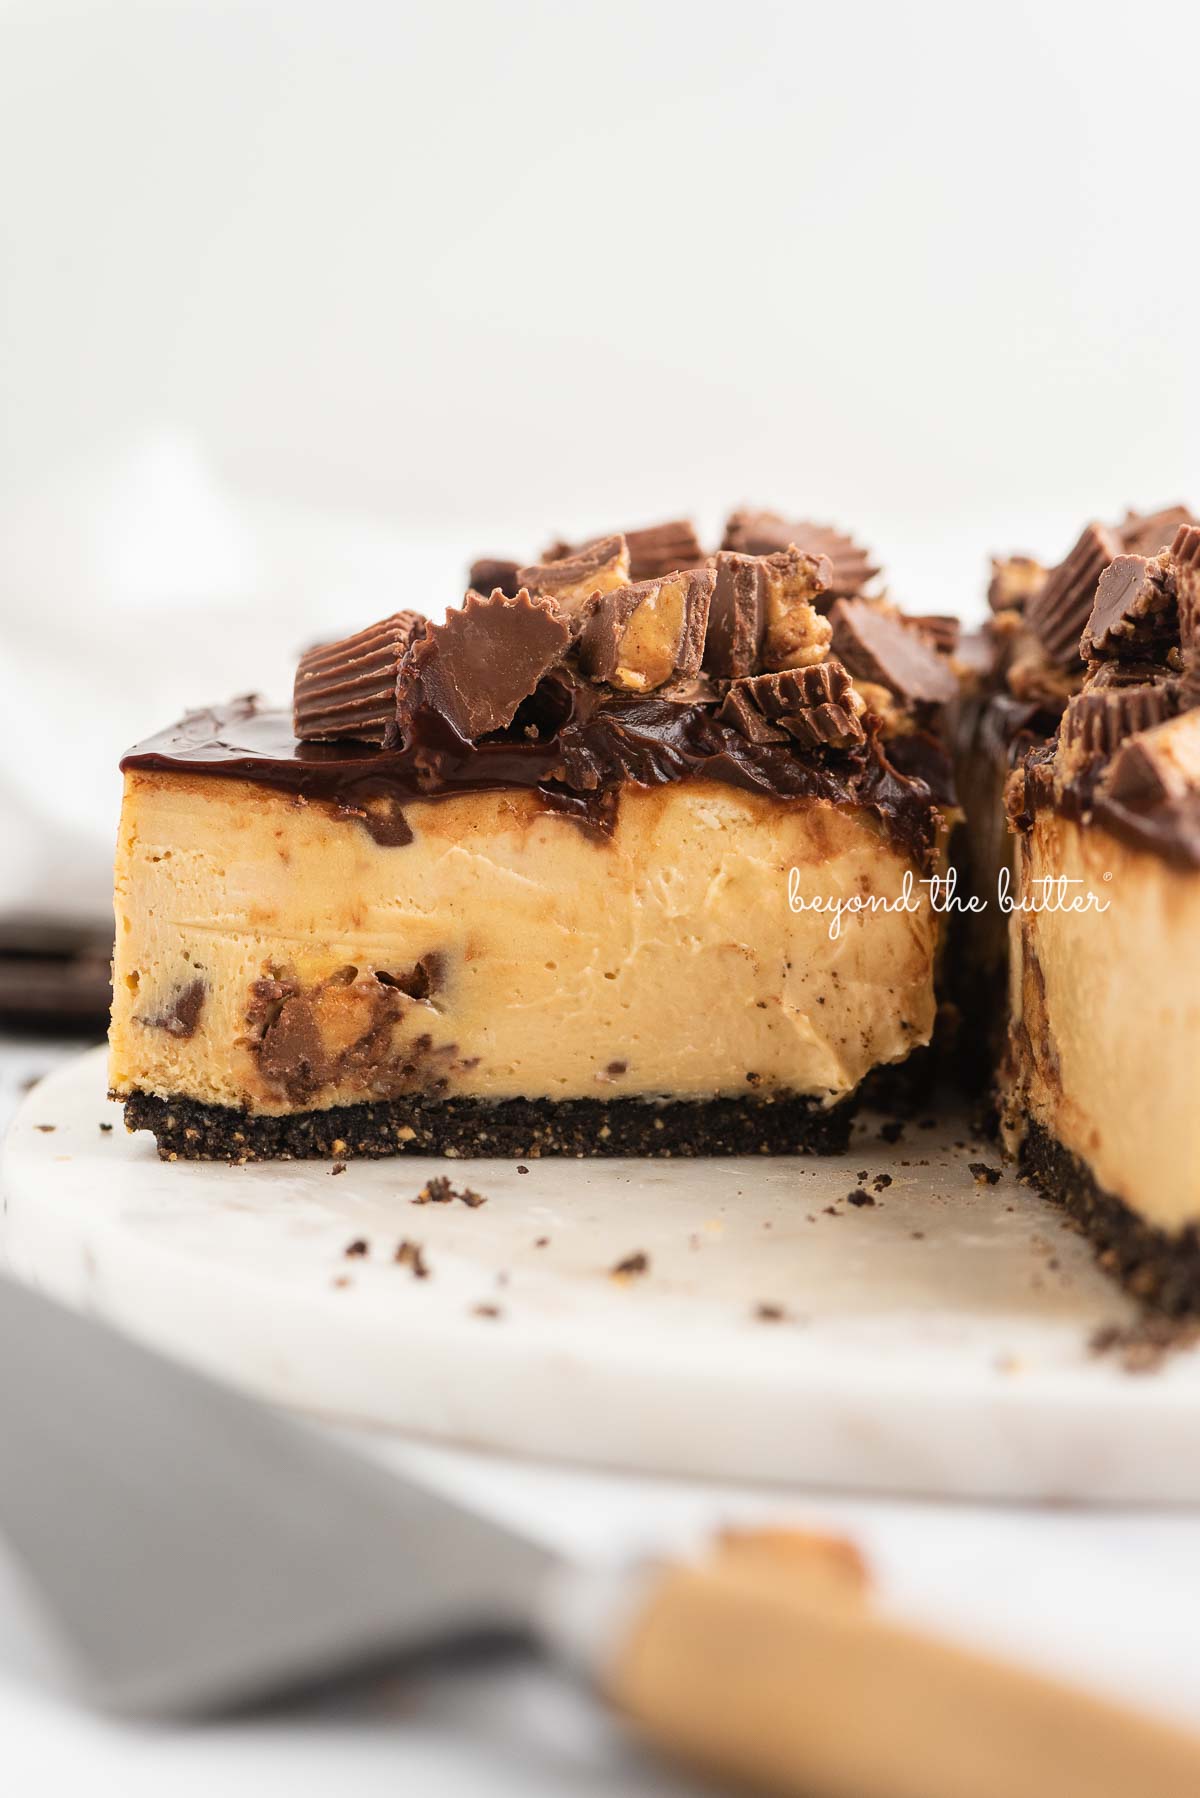
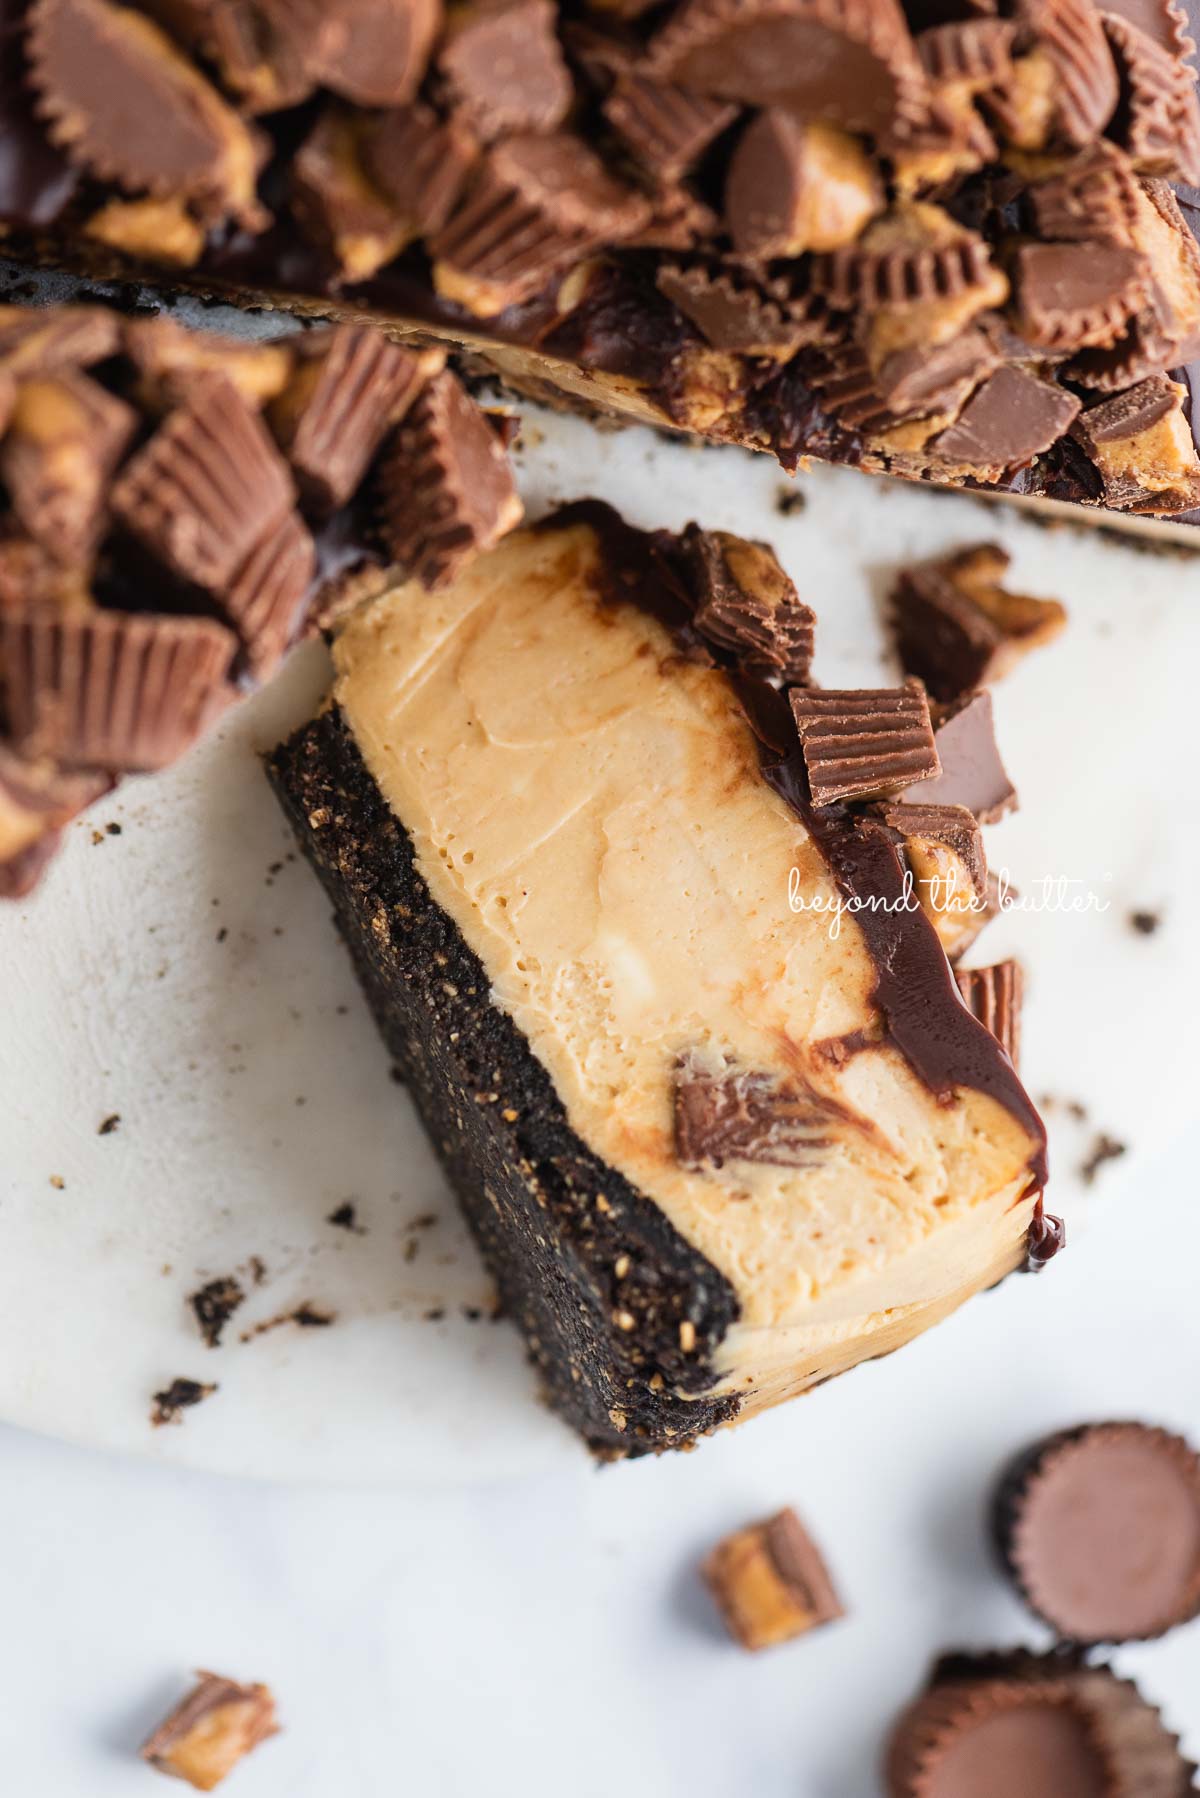
This truly decadent Reese’s Peanut Butter Cup Cheesecake combines a buttery, Oreo cookie crust with a peanut butter cheesecake filling that’s mixed with chopped pieces of miniature Reese’s peanut butter cups. It’s the perfect dessert to share with those who love cheesecake or a really good chocolate-peanut butter treat!
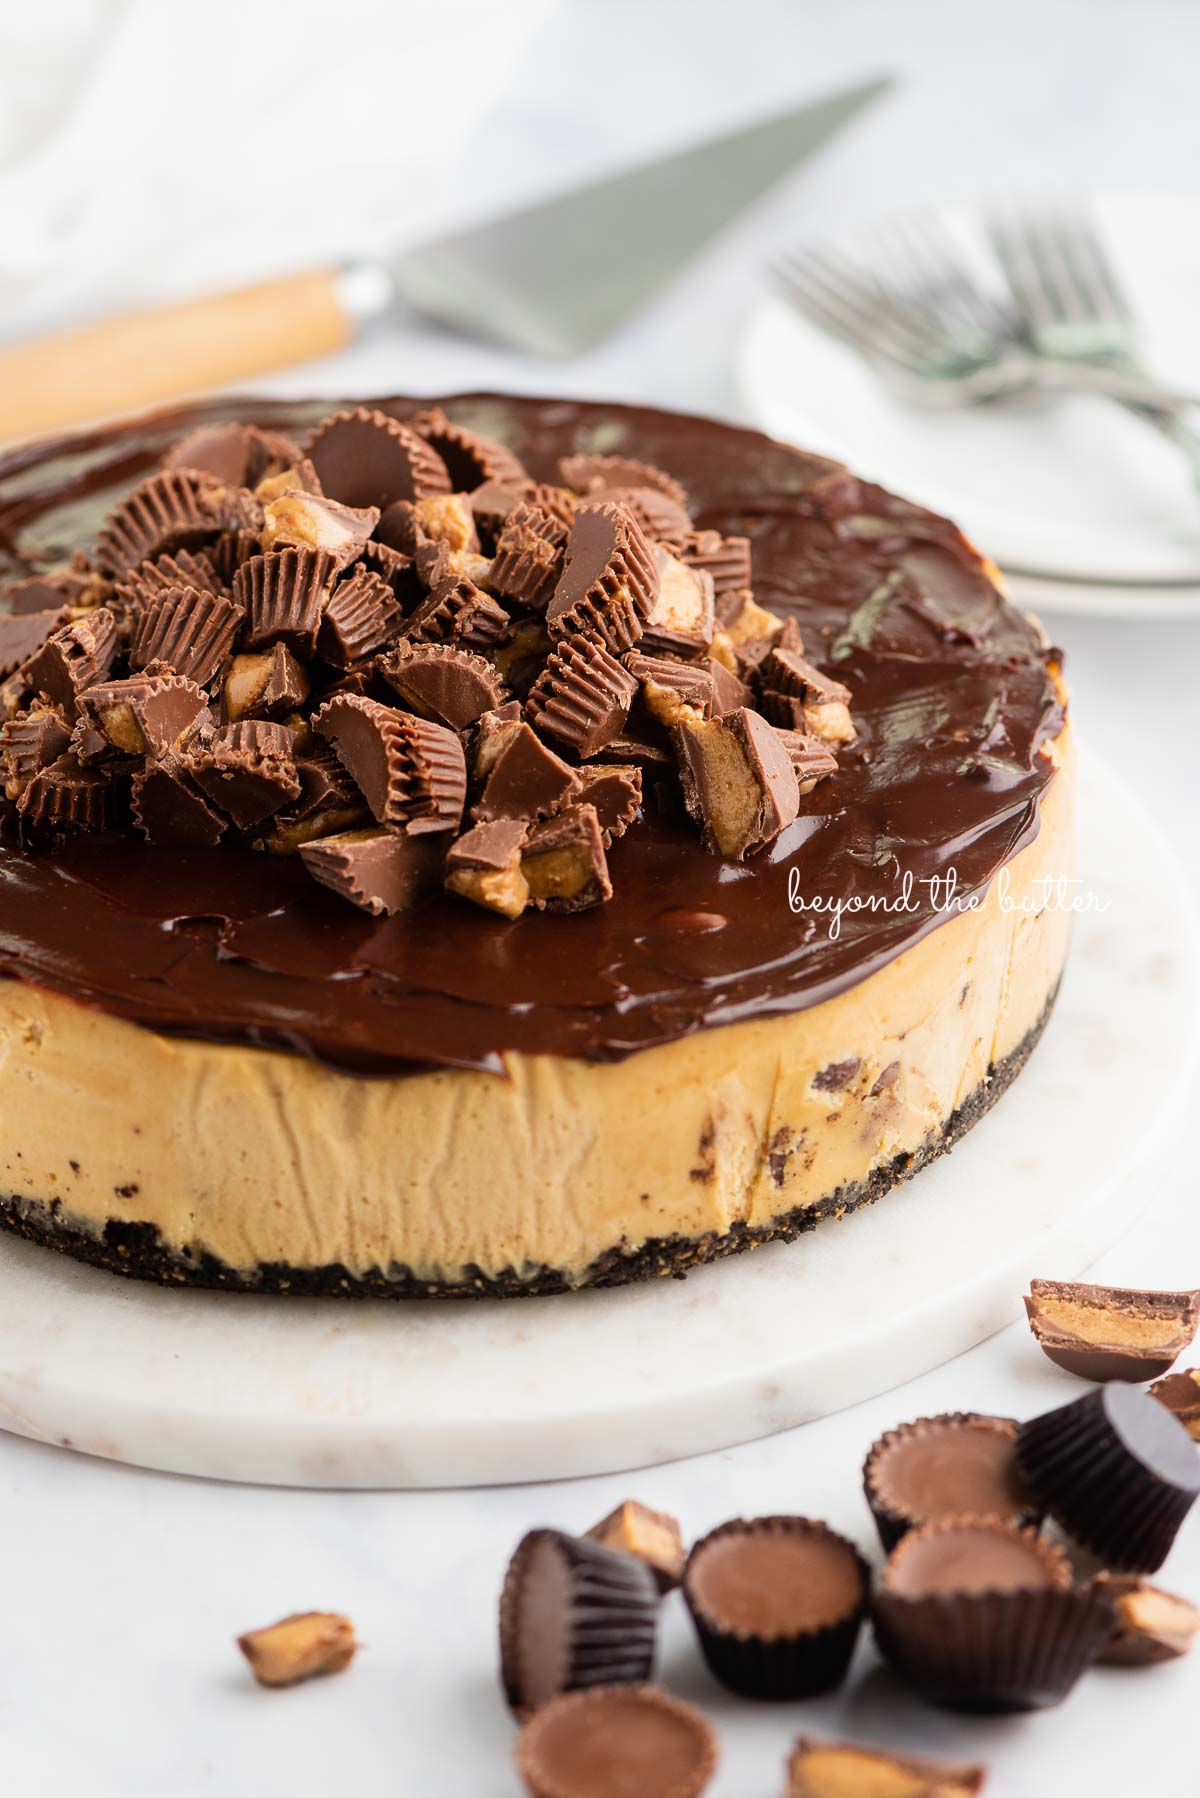
Table of Contents
Why You’ll Love This Recipe
- It’s a decadent, rich, and creamy dessert—one slice will easily satisfy your sweet tooth!
- The perfect dessert for any chocolate peanut butter cheesecake lover in your life.
- It has the best peanut butter flavor and it’s filled with mini Reese’s peanut butter cups!
- Top it with a silky smooth chocolate ganache and more peanut butter cups for a next-level dessert.
- This Reese’s cheesecake is paired with a baked Oreo cookie crust with bits of roasted peanuts in each bite—it is phenomenal!
This Reese’s peanut butter cup cheesecake is very easy to make but does require patience. It requires a bake time of 50-55 minutes, a cool-down time (in the oven) of 45 minutes, letting it cool completely at room temperature for 1-2 hours, and finally, allowing it to set in the refrigerator for a minimum of 4 hours. But it’s very much worth the wait—I promise!
And if you love this cheesecake recipe, check out my S’mores Cheesecake recipe!
Ingredients Needed
Cookie Crust
Making this Oreo sandwich cookie crust is easy and requires only the five following ingredients.
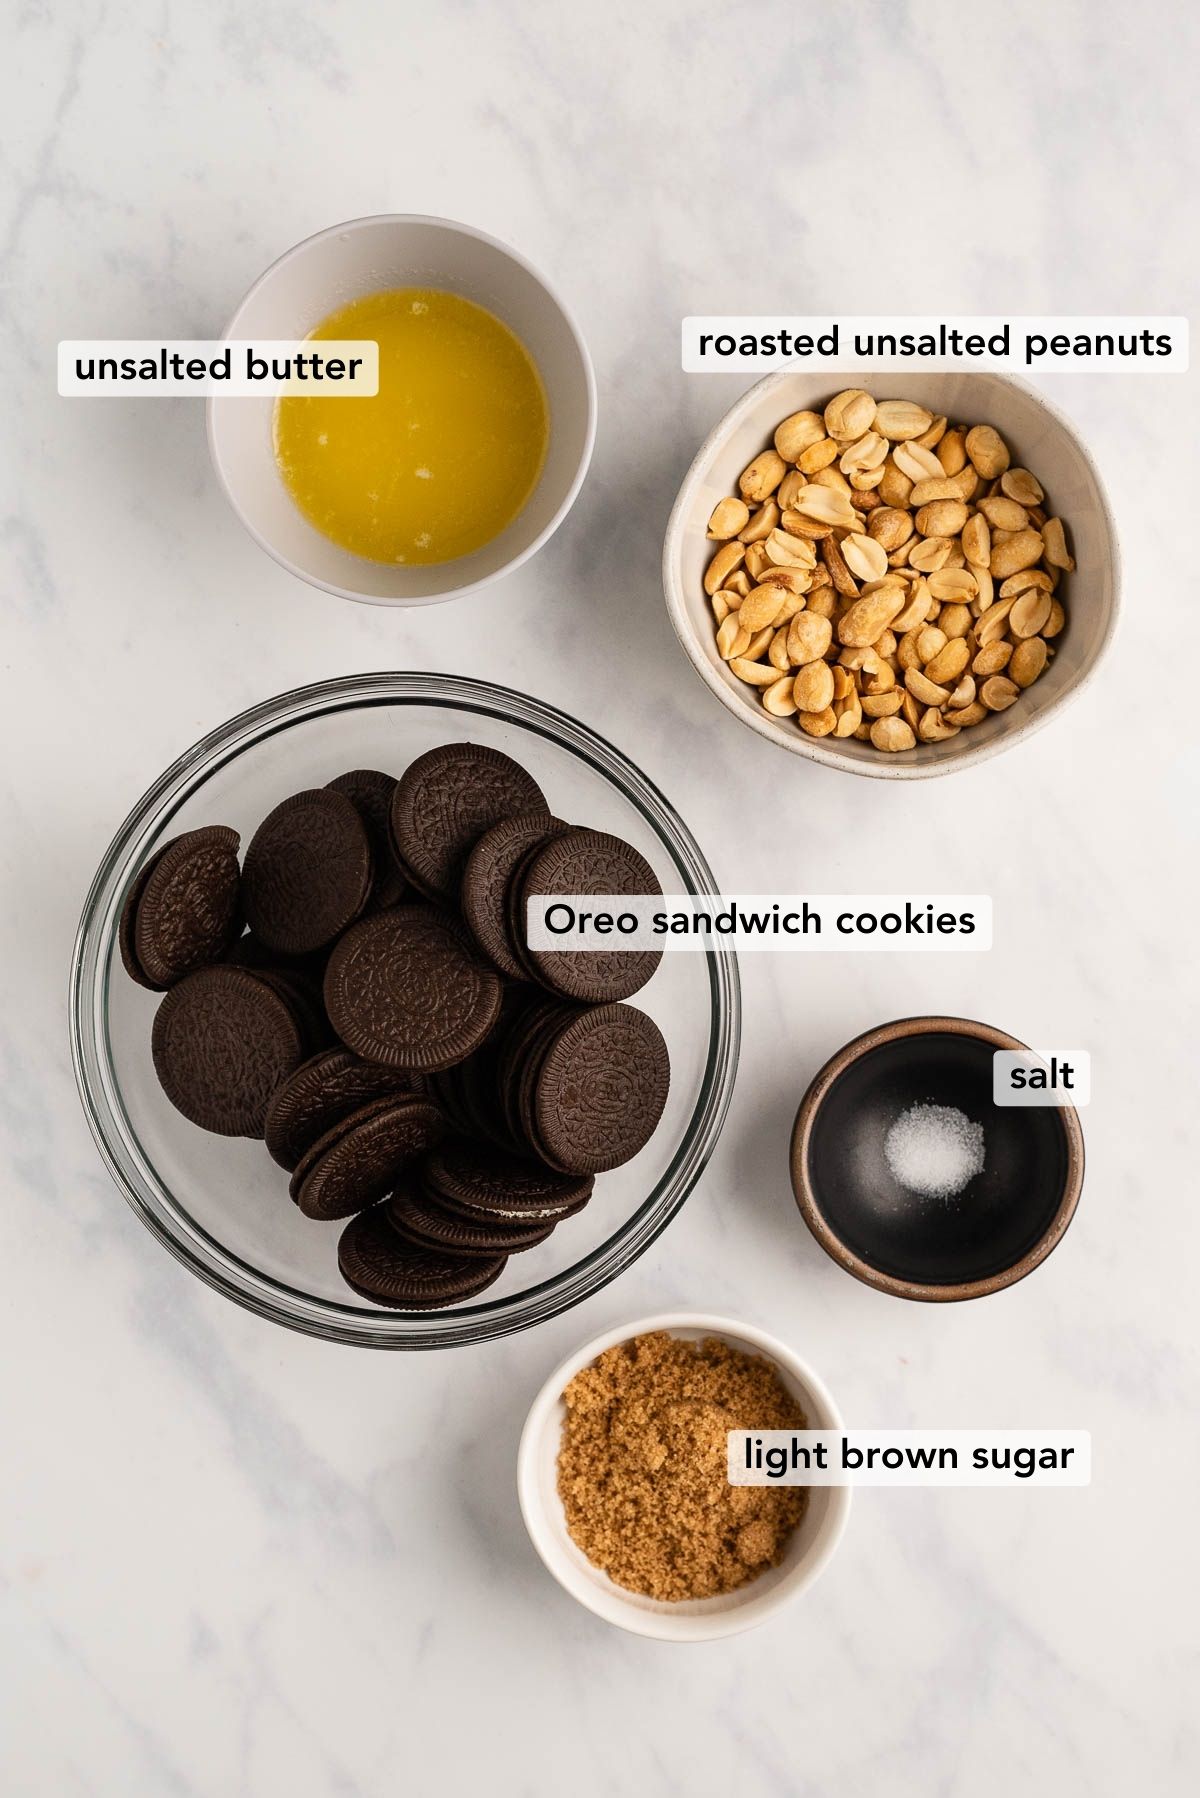
- Oreo Sandwich Cookies. You’ll need approximately 28 cookies which can be the original size and flavor or you can use the Oreo thin cookies. You can also substitute them with chocolate wafer cookies (like the ones from Nabisco).
- Unsalted Butter. This is what brings all of the other ingredients together. You can sub out the unsalted butter for salted butter, but omit the salt that is used.
- Light Brown Sugar. Also helps blend the ingredients together and adds a little bit more flavor.
- Roasted Unsalted Peanuts. This is an optional ingredient, but it helps give this peanut butter cup cheesecake a bit more peanut butter flavor and it helps cut down on the sweetness of the cookies. If you use salted peanuts, omit the salt from the recipe.
- Salt. Only a pinch is needed but also helps to cut down on the sweetness.
Cheesecake Batter
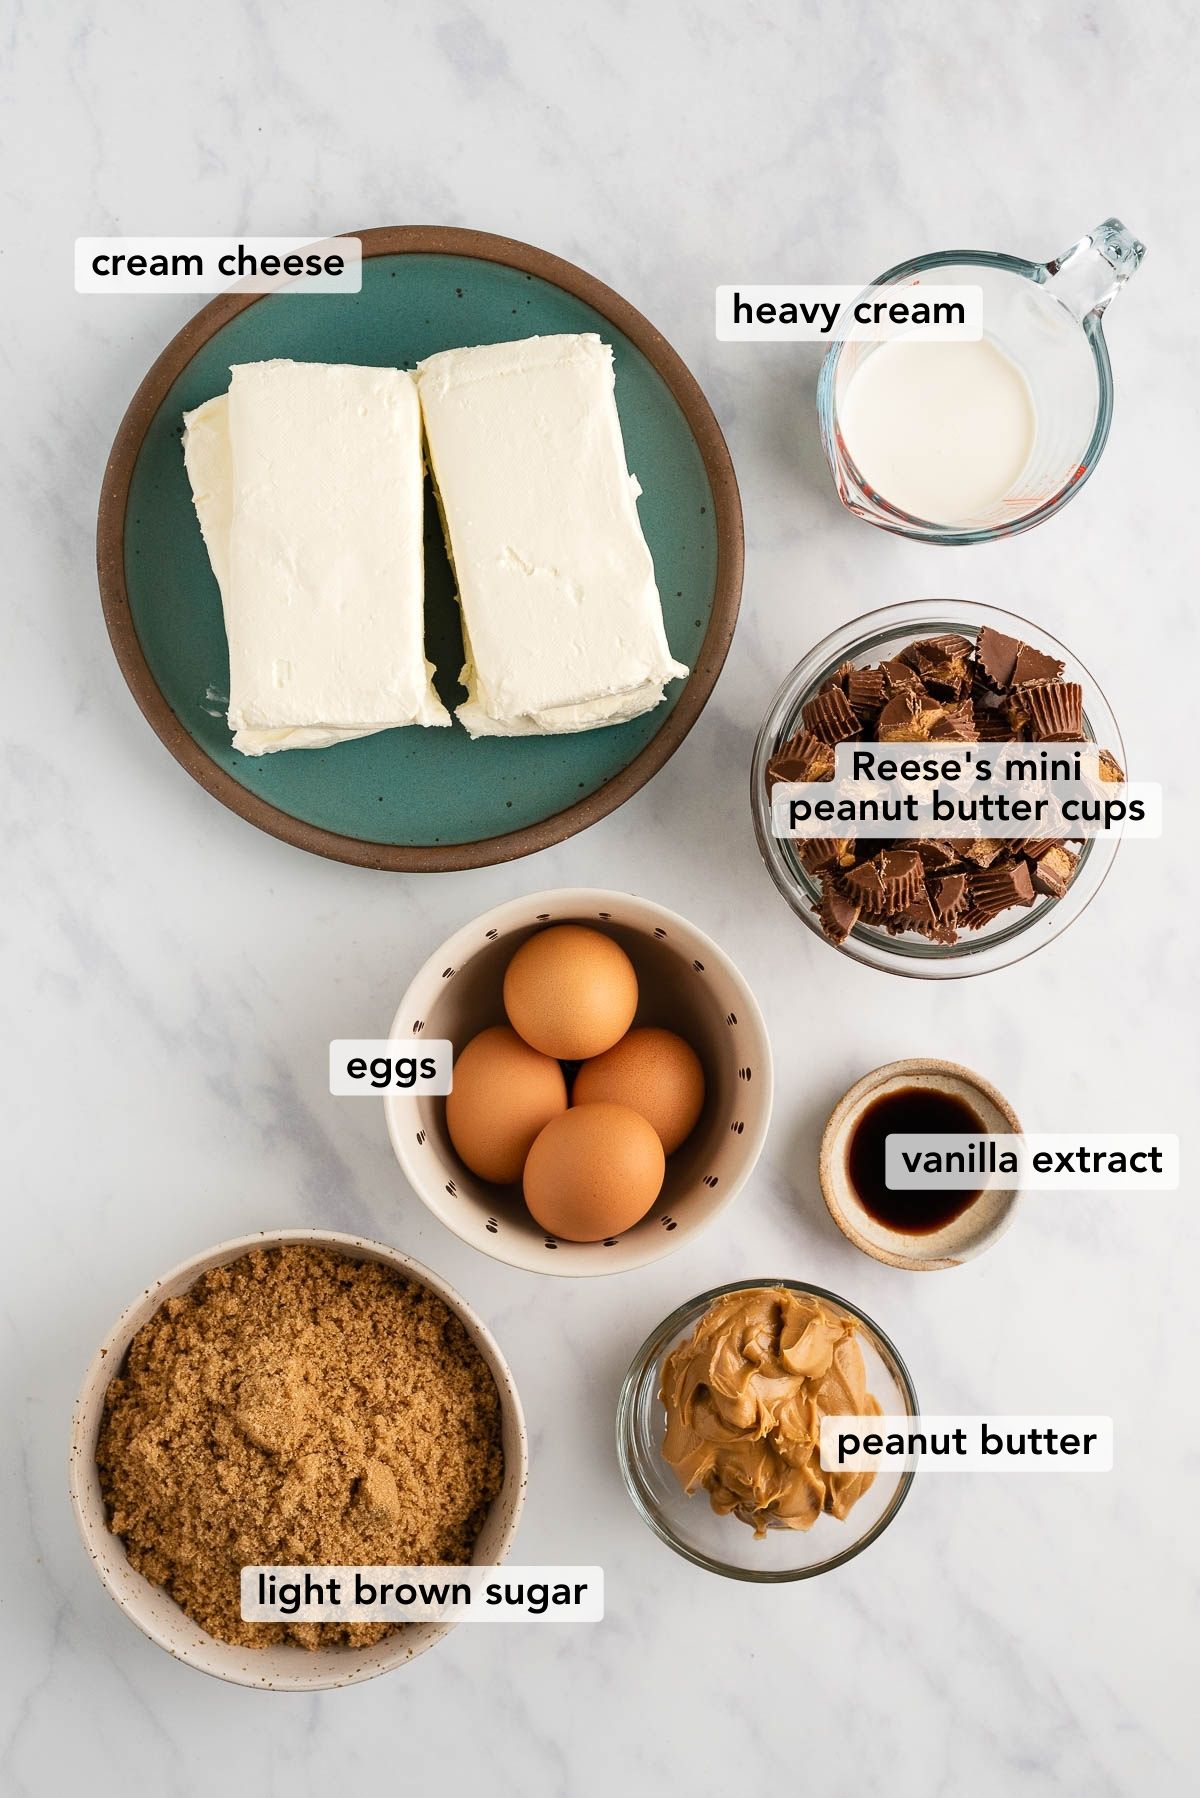
Made in a 9-inch springform pan, you only need seven ingredients to make this Reese’s peanut butter cup cheesecake batter!
- Cream Cheese. Four 8-ounce blocks of cream cheese are needed for this Reese’s cheesecake recipe, and it’s very important that they are softened and at room temperature.
- Light Brown Sugar. Adding 1 1/2 cups of light brown sugar versus granulated sugar lends itself well to a nice flavor boost!
- Peanut Butter. Only a 1/2 cup is needed to give this cheesecake the perfect peanut buttery taste! Make sure to use regular, creamy peanut butter and not the natural style, as the oil can do some not-so-nice things to your cheesecake batter!
- Vanilla Extract. One teaspoon helps to round out the flavors for this chocolate peanut butter cheesecake recipe!
- Eggs. This is the ingredient that brings the cheesecake together! The four large eggs needed should be at room temperature and slightly whisked before they are added to the mixture.
- Heavy Whipping Cream. Adding heavy whipping cream versus sour cream gives this cheesecake a very creamy texture!
- Miniature Reese’s Peanut Butter Cups. For the peanut butter cheesecake filling, you will need one 10.5-ounce bag. You’ll chop these up into small bits and fold them into the batter at the end. Buy an extra bag if you want to add more to the top of the cheesecake before or after baking.
How to Make the Recipe
Cookie Crust
I love this Oreo cookie crust because it requires very few ingredients, it’s a slightly crunchier-style crust because of the peanuts, and it pairs very well with Reese’s peanut butter cup cheesecake batter!
Before starting your chocolate wafer crust, I like to prep my 9-inch springform pan by generously spraying it with a flour-based baking spray. Then I line the bottom with parchment paper. You can line the sides of the springform pan too if you prefer.
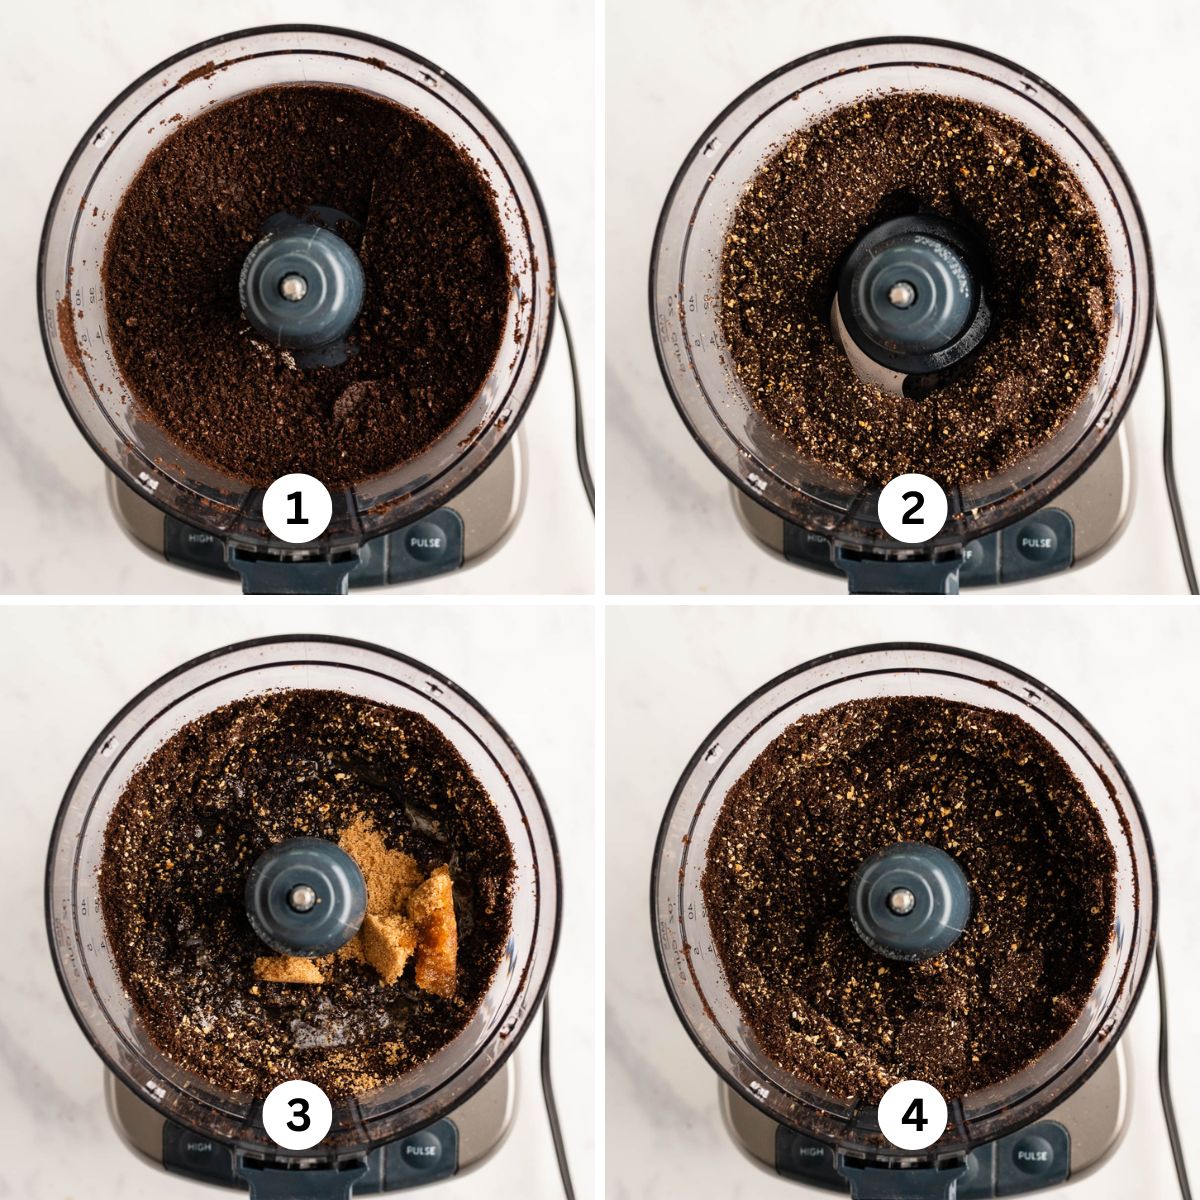
Step 1. Process the Oreo cookies into crumbs. If the cookies are stacked too high in the food processor, you can break them apart to make them fit better (Image 1).
Step 2. Add in the roasted unsalted peanuts. Pulse the food processor until the peanuts are broken down into teeny tiny bits (Image 2).
Step 3. Add the light brown sugar, salt, and melted unsalted butter. Pulse the food processor until the Oreo cookie crust forms a thicker mixture. It will clump up inside the food processor a little (Images 3 and 4).
Step 4. Transfer the cookie crust to the springform pan.
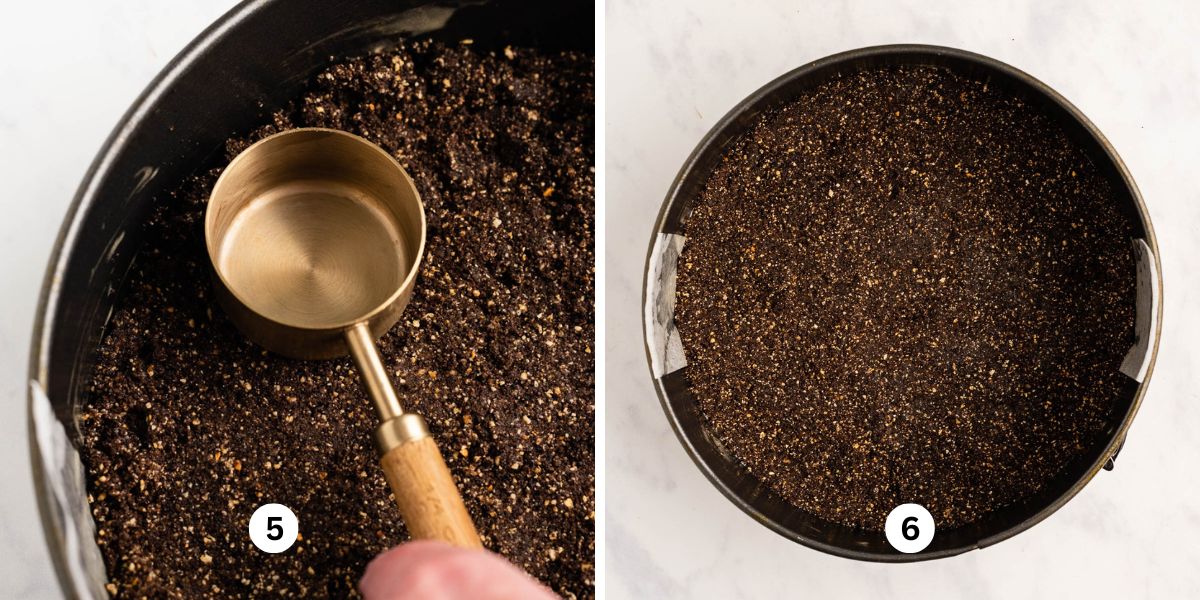
Step 5. Press the cookie crust mixture into the bottom of the springform pan. It should be packed down as tightly as possible. You can use the bottom of a measuring cup, spatula, or glass to do this (Image 5).
Step 6. Bake the Oreo cookie crust. Your oven rack should be placed in the middle or center position. Bake the Oreo cookie crust for 8-10 minutes at 325ºF. Let it cool on a wire cooling rack until it’s cool to the touch. Reduce the oven temperature to 350ºF for the next part—the Reese’s peanut butter cup cheesecake batter (Image 6)!
Cheesecake Batter
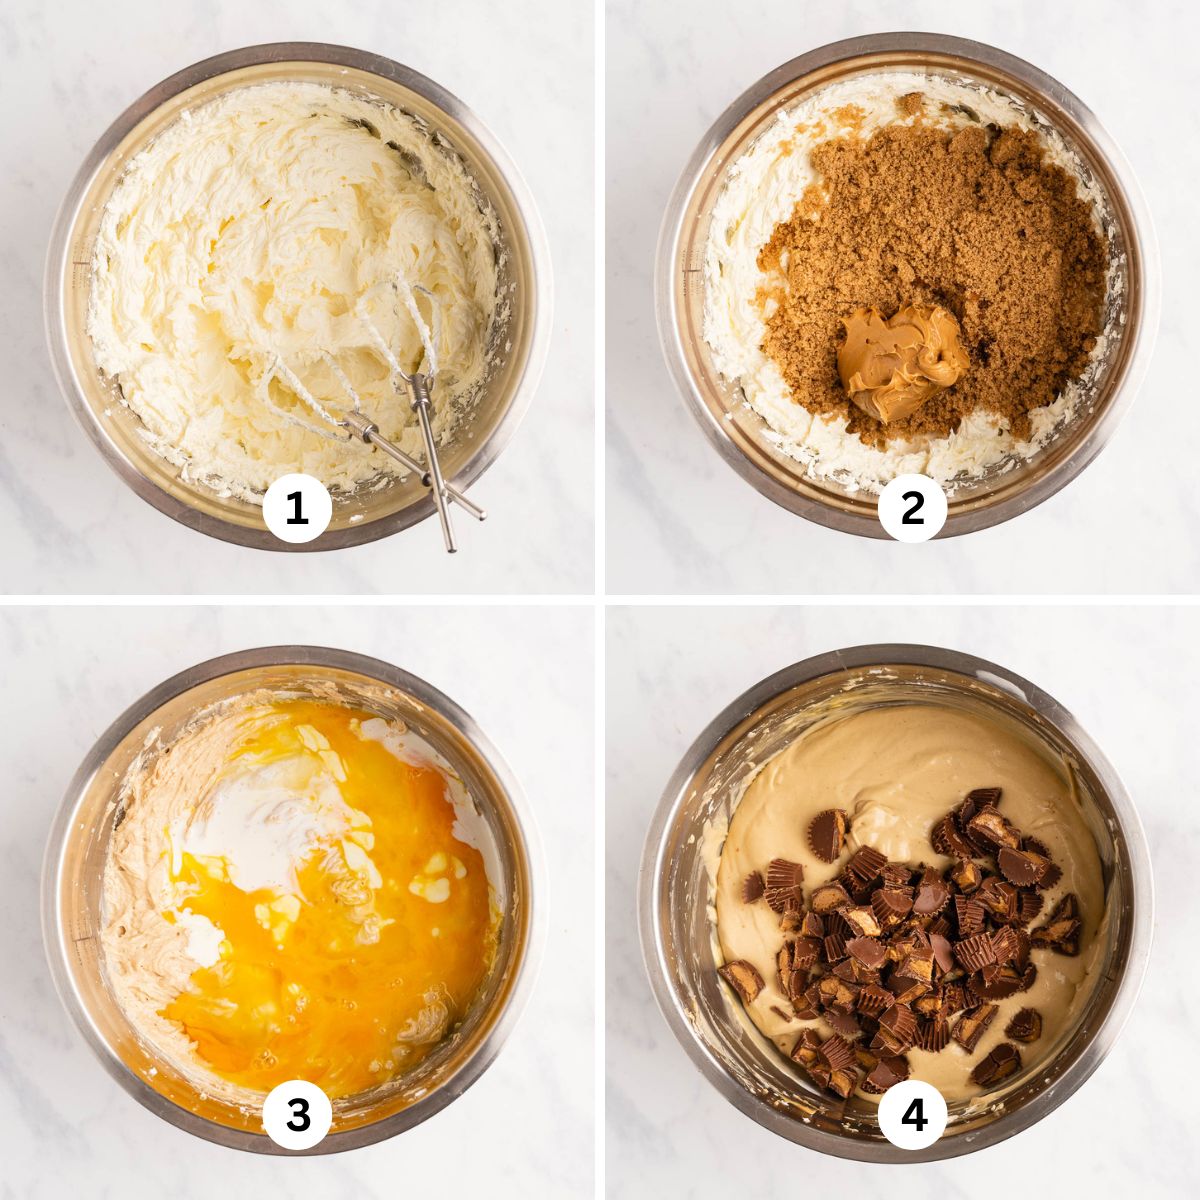
Step 1. Beat the softened cream cheese. You can do this with either your hand mixer or stand mixer that’s fitted with the paddle attachment. To help eliminate any possible lumps in your peanut butter cheesecake batter, it’s best to beat the cream cheese for a good 4-5 minutes or until it’s lighter and fluffier in texture (Image 1).
Step 2. Add in the light brown sugar, peanut butter, and vanilla extract. Mix on medium speed to help blend these ingredients together (Image 2).
Step 3. Add in the heavy cream and eggs. Make sure you’ve whisked your eggs slightly before adding them to the cheesecake batter. This helps avoid overmixing your batter. Your peanut butter cheesecake batter should be smooth and thick (Image 3).
Step 4. Fold in the mini peanut butter cups. Use a spatula for this part to avoid overmixing the batter (Image 4).
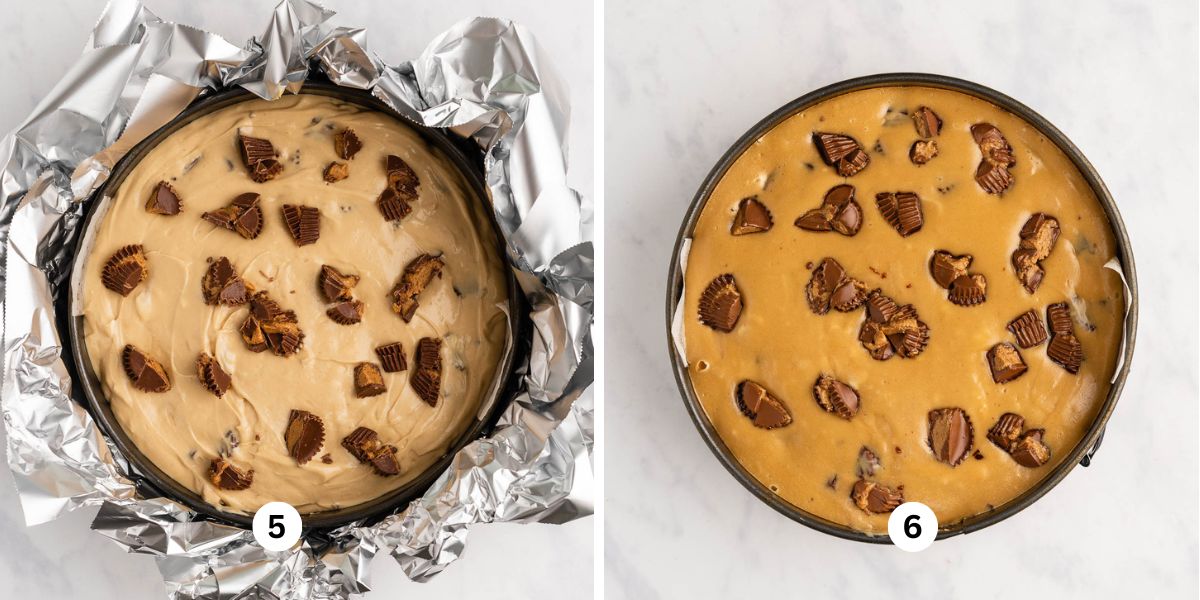
Step 5. Prep your springform pan with aluminum foil, boil the water, then bake. Before adding the cheesecake batter to the springform pan, wrap 5-6 overlapping sheets of aluminum foil around the bottom pan. Pour the cheesecake batter into the pan then place it into a roasting pan (Image 5).
Next, boil some water in the microwave for 4-5 minutes on high. Place the roasting pan with the cheesecake into the oven, but before closing the door, very carefully pour the boiling water into the roasting pan, filling it up until it reaches halfway up the sides.
Bake the peanut butter cheesecake for 50-55 minutes at 350ºF (Image 6). For reference, mine baked perfectly at 50 minutes. During baking, do not open the oven door. It will let the steam out of the oven.
When done baking, turn the oven off, and let the oven and cheesecake cool down with the oven door closed for 45 minutes. Your Reese’s peanut butter cup cheesecake will be jiggly. This is okay. The cheesecake will continue to set as it cools to room temperature and when you chill it in the refrigerator.
Step 6. Let the cheesecake cool. Remove the cheesecake from the oven and roasting pan, then carefully remove the aluminum foil layers. Let it cool to room temperature on a wire cooling rack. This may take 1-2 hours.
Loosely cover the top of the cheesecake in aluminum foil, then place it in the refrigerator for a minimum of 4 hours. Overnight is my preference, however.
Chocolate Ganache Topping
If you want to up the decadence of this chocolate peanut butter cheesecake recipe, top it with this silky smooth chocolate ganache! You only need a small glass bowl, a whisk, semi-sweet chocolate chips, and heavy whipping cream.
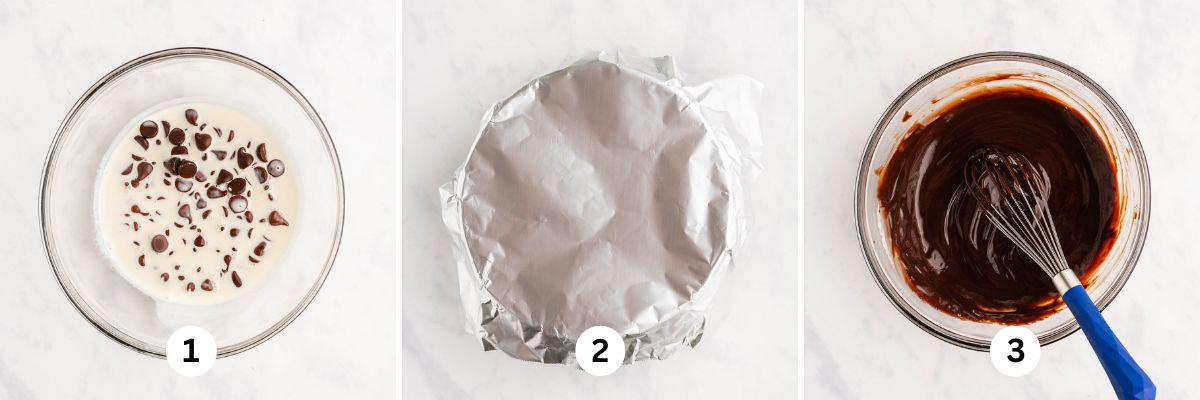
Step 1. Add semi-sweet chocolate chips to a small glass bowl. Heat up the heavy whipping cream in the microwave, then pour it over the top of the chocolate chips (Image 1).
Step 2. Cover the mixture with aluminum foil. Let the mixture sit covered for 2 minutes (Image 2).
Step 3. Whisk the mixture. Slowly whisk the mixture until the chocolate has melted and the ganache is nice and smooth (Image 3). Pour over the top of your Reese’s peanut butter cup cheesecake. And if desired, top it with more mini peanut butter cups.
Helpful Tips
Here are some tips I have learned along the way that I hope will help ease your mind a little while you make this Reese’s peanut butter cup cheesecake.
Buy yourself a springform pan. Cheesecakes are best baked in a springform pan because the sides can easily be removed after it’s cooled. Trying to get a cheesecake out of a non-springform pan is just way too complicated and you end up cursing a lot.
Wrap it up. Wrap the sides of your springform pan in 5-6 layers of aluminum foil. In addition to using a well-made springform pan, having this extra layer of protection will help your cheesecake from leaking. I haven’t had any leaks yet, but this tip is always a good one for those “just in case” moments.
Don’t forget the water bath. A water bath is an important and helpful tip that can save your cheesecake from drying out, sinking, or cracking. Having one creates a nice steam bath inside your oven, like a little sauna, and all that moisture will help keep your cheesecake nice and moist.
Keep the oven door closed. Do not open the oven door as your cheesecake bakes. Doing so will let out all that nice steam your oven created with the water bath.
Essential Baking Tools
More Chocolate-Peanut Butter Desserts!


If you tried this Reese’s Peanut Butter Cup Cheesecake Recipe or any other recipe on my website, please leave a 🌟 star rating and let me know what you thought in the 📝 comments below. Thanks for visiting!
Reese’s Peanut Butter Cup Cheesecake

Ingredients
Oreo Cookie Crust
- 1 1/2 cups Oreo Cookies (approximately 28), finely crushed
- 1/2 cup Roasted Unsalted Peanuts, chopped, optional
- 2 tbsp Light Brown Sugar
- 1/8 tsp Salt
- 5 tbsp Unsalted Butter, melted
Reese's Peanut Butter Cup Cheesecake Batter
- 32 oz Cream Cheese, softened to room temperature
- 1 1/2 cup Light Brown Sugar, firmly packed
- 1/2 cup Creamy Peanut Butter
- 1 tsp Vanilla Extract
- 1/4 cup Heavy Whipping Cream
- 4 Large Eggs, room temperature and slightly whisked
- 10.5 oz Reese’s Miniature Peanut Butter Cups (1 small bag), chopped into small pieces, plus extra for topping before/after baking, if desired
Chocolate Ganache Topping (optional)
- 4 oz Semi-Sweet Chocolate Chips
- 1/3 cup Heavy Whipping Cream
Instructions
Oreo Cookie Crust
- Adjust your oven rack to the center or middle position and preheat the oven to 350ºF.
- Using a flour-based baking spray, generously coat the bottom and sides of a 9-inch springform pan, then line the bottom with parchment paper. Alternatively, you can also line the sides of the springform pan as well. Set to the side.
- Using a food processor, pulse the Oreo sandwich cookies into fine crumbs. Add in the unsalted roasted peanuts and pulse again until they are chopped and well blended with the cookie crumbs.1 1/2 cups Oreo Cookies (approximately 28), 1/2 cup Roasted Unsalted Peanuts
- Add in the light brown sugar, salt, and melted butter then pulse together again until completely blended.2 tbsp Light Brown Sugar, 1/8 tsp Salt, 5 tbsp Unsalted Butter
- Press the Oreo cookie crust mixture into the bottom of the prepared 9-inch springform pan, then place in the oven and bake for 8-10 minutes at 350ºF.
- Remove the baked cookie crust from the oven and place it on a wire cooling rack to cool while you make the Reese's peanut butter cup cheesecake batter. Reduce the oven temperature at this time to 325ºF.
- Once the cookie crust has cooled to the touch, wrap the bottom of the springform pan in 5-6 overlapping sheets of aluminum foil. The foil should come up high enough along the sides to help keep water from the water bath from getting into the cheesecake during baking. Set to the side.
Reese's Peanut Butter Cup Cheesecake Batter
- Using your hand mixer or stand mixer fitted with the paddle attachment, beat the softened, room-temperature cream cheese on medium-high speed for about 4-5 minutes until it's lighter and fluffier in texture. This will help eliminate any possible lumps later.32 oz Cream Cheese
- Add in the light brown sugar, peanut butter, and vanilla extract, and continue to mix together on medium speed until well blended.1 1/2 cup Light Brown Sugar, 1/2 cup Creamy Peanut Butter, 1 tsp Vanilla Extract
- Reduce the mixer to a low speed, adding in the heavy whipping cream and slightly whisked eggs, mixing together until just combined. Do not over-mix the cheesecake batter.1/4 cup Heavy Whipping Cream, 4 Large Eggs
- Fold in the chopped miniature Reese's peanut butter cups using a spatula.10.5 oz Reese’s Miniature Peanut Butter Cups (1 small bag)
- Make sure the bottom of your springform pan is wrapped in foil before this next step. Pour the peanut butter cup cheesecake batter into the cooled cookie crust. Top with any extra pieces of Reese's peanut butter cups, if desired.
- Using a large microwave-safe glass measuring cup, boil close to 4 cups of water in the microwave for 4-5 minutes on high.
- Place the peanut butter cup cheesecake into a roasting pan, then place it onto the middle rack of the oven. Before closing the door, carefully fill the roasting pan with the boiling water until it reaches halfway up the sides of the springform pan. Alternatively, you can fill the roasting pan with some of the boiling water, then place your cheesecake in the pan. Make sure the water does not go up too high or spill over.
- Bake the Reese's peanut butter cup cheesecake for approximately 50-55 minutes at 325ºF. When done, turn off the oven and, with keeping the oven door closed, allow the cheesecake to cool down in the water bath for 45 minutes.
- Carefully remove the cheesecake from the roasting pan (it will still be jiggly) and remove the aluminum foil layers. Then place it on a trivet or wire cooling rack to sit at room temperature for 1-1.5 hours or until it's cooled completely.
- Once cooled, loosely cover the top of the cheesecake with aluminum foil or plastic wrap and place it in the refrigerator for a minimum of 4 hours or, my preference, overnight.
- When ready to serve, release the sides from the springform pan, slice, and enjoy! Optionally you can top this peanut butter cup cheesecake with chocolate ganache and more miniature peanut butter cups.
Chocolate Ganache Topping
- Place the semi-sweet chocolate chips in a small glass bowl. Set to the side.4 oz Semi-Sweet Chocolate Chips
- Heat the heavy whipping cream in the microwave using a microwave-safe glass measuring cup for 1 minute on high. Pour the warm heavy whipping cream over top of the semi-sweet chocolate chips, then loosely cover with aluminum foil for 2 minutes.1/3 cup Heavy Whipping Cream
- Remove the cover, then slowly whisk the mixture together until the chocolate ganache is melted and smooth. Pour over top of the cheesecake, then spread out with an offset spatula. Optionally, top with more miniature peanut butter cups as well.
Video
Notes
- Recommended baking times listed above for the recipe do not include the 8-10 minutes for baking the Oreo cookie crust, room temp cooling (60 minutes), and refrigerator chilling (4-8 hours).
- 1 bag of Miniature Reese’s Peanut Butter Cups equals 10.5 ounces. One bag covers the amount needed for the peanut butter cheesecake batter only. If you wish you add more peanut butter cups to the top of the cheesecake before and/or after baking, it’s recommended to buy 2 bags.
- In place of Oreo sandwich cookies, you can use Nabisco chocolate wafers.
- After baking the crust, don’t forget to reduce the oven temp to 350ºF to 325ºF.
- Do not open the oven door to check on your cheesecake during baking.
- After turning off your oven, do not open the oven door while the cheesecake cools down in the water bath.
- Your cheesecake will be jiggly (mainly in the center). This is okay. It will set while it continues to cool and when it sets in the refrigerator during chilling.
- Recipe adapted from A Taste of Bedminster Elementary Cookbook.
Nutrition
Nutritional information provided above is an estimate only and will vary based on specific ingredients used. See Nutritional Disclaimer for more info.


WOW…I made this for my son’s birthday. It turned out great and I didn’t use a spring pan and I didn’t put it in a dish of water. I baked it in corning-ware and put the water in a pan on the oven shelf directly under it. I also added a bit of crunchy peanut butter to the Oreo crust.
can I just bake instead of doing the water bath? if so, how much time to bake?
I never tested this recipe without a water bath so I wouldn’t be able to give a bake time that doesn’t use one. Sorry! I do highly recommend using a water bath for this recipe as it will prevent the cheesecake from drying out and cracking.
Dang gum. I forgot to spray pan on the sides and bottom of the pan.
. Will it come out?
You might be okay! After the cheesecake has chilled in the fridge, you can carefully run a pairing knife along the edge before you release the springform pan.
Do you remove the cream out of the Oreos before making the crust?
Hi! No, I process the entire cookie.
Can I make this gluten free? would I just use gluten free oreos? I made this years ago and people thought it was store bought! So good. I wanted to make it again, but GF.
I never tested it with any gluten free Oreos so can’t speak for the taste, but you can certainly make that swap!
This was a HUGE HIT at a holiday party that my husband and I attended. I actually, made a 7 inch version and it was SUPERB!! It has gone into my “Hall of Fame” recipe folder 🙂