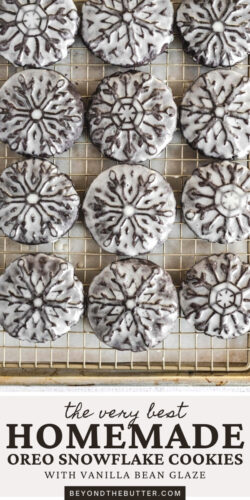
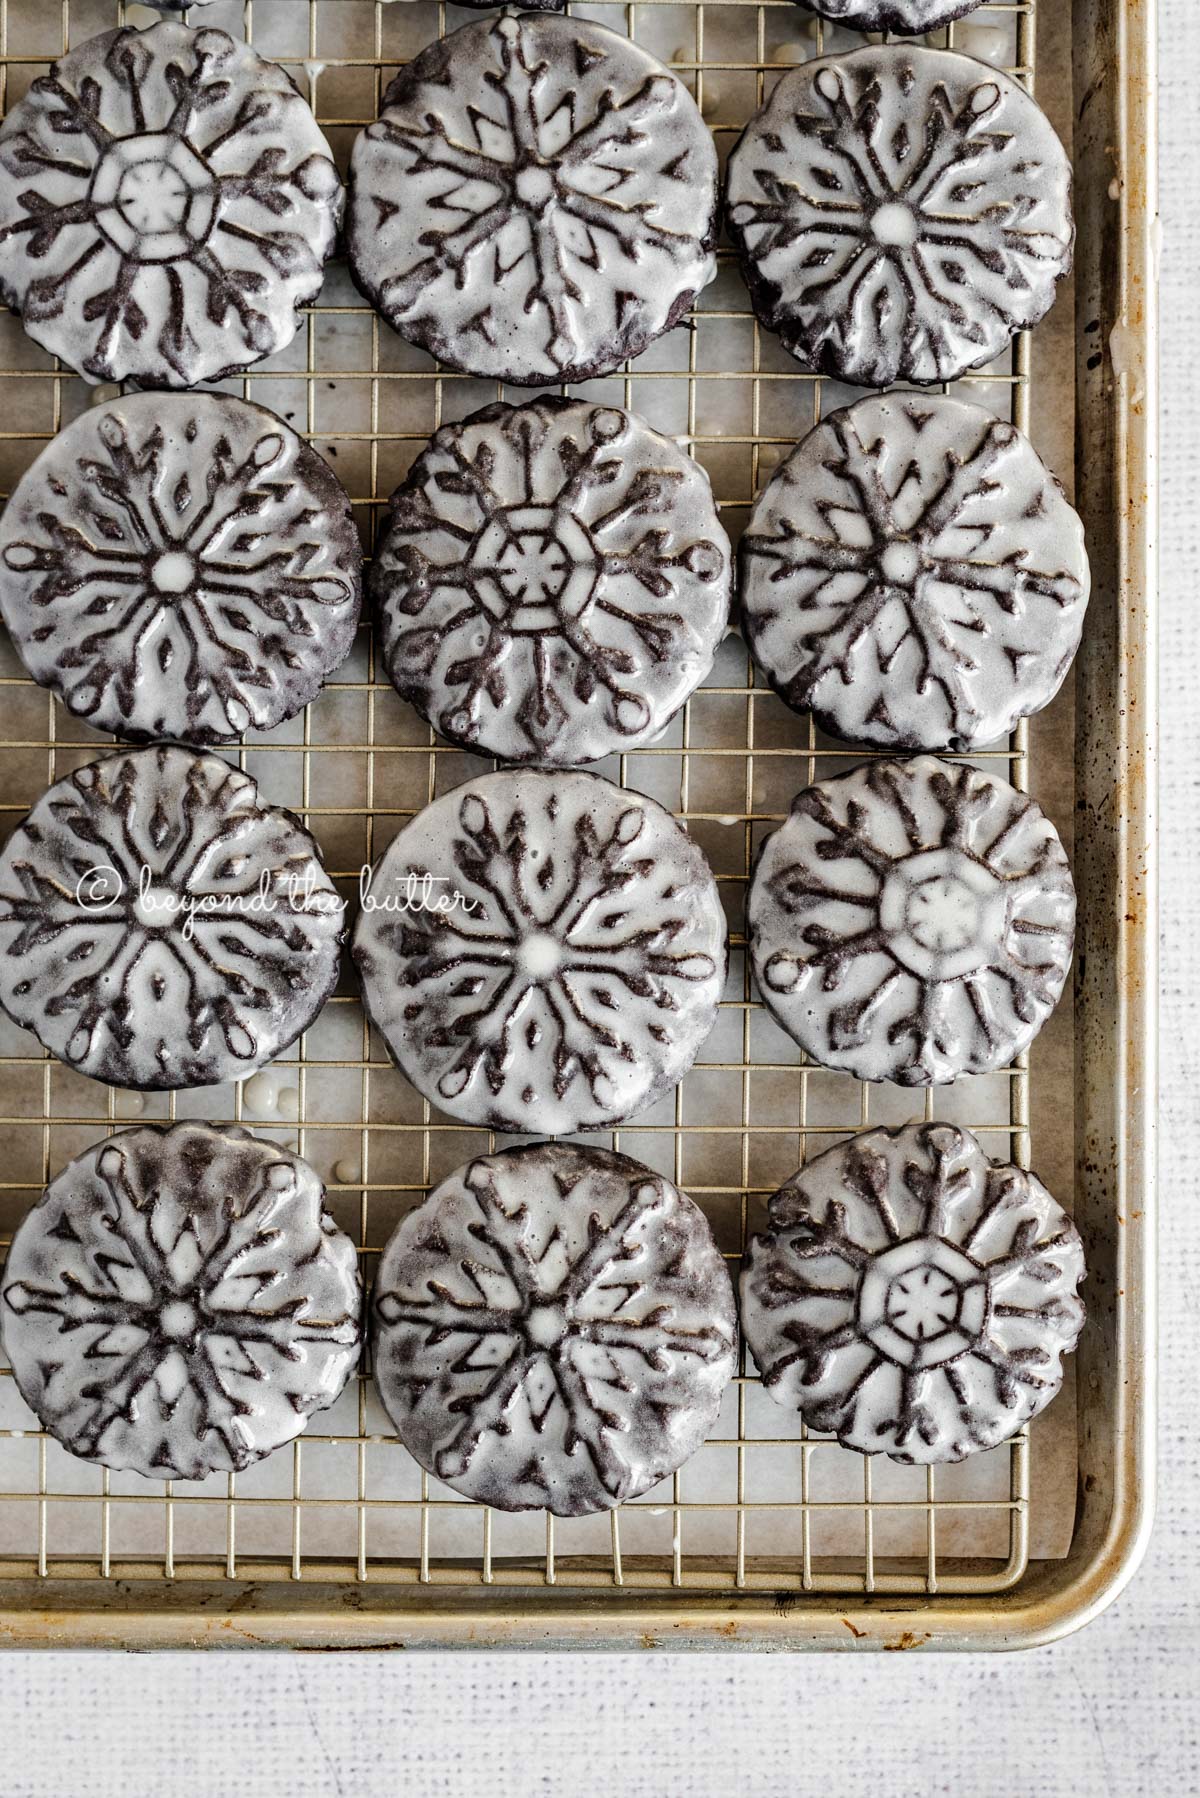
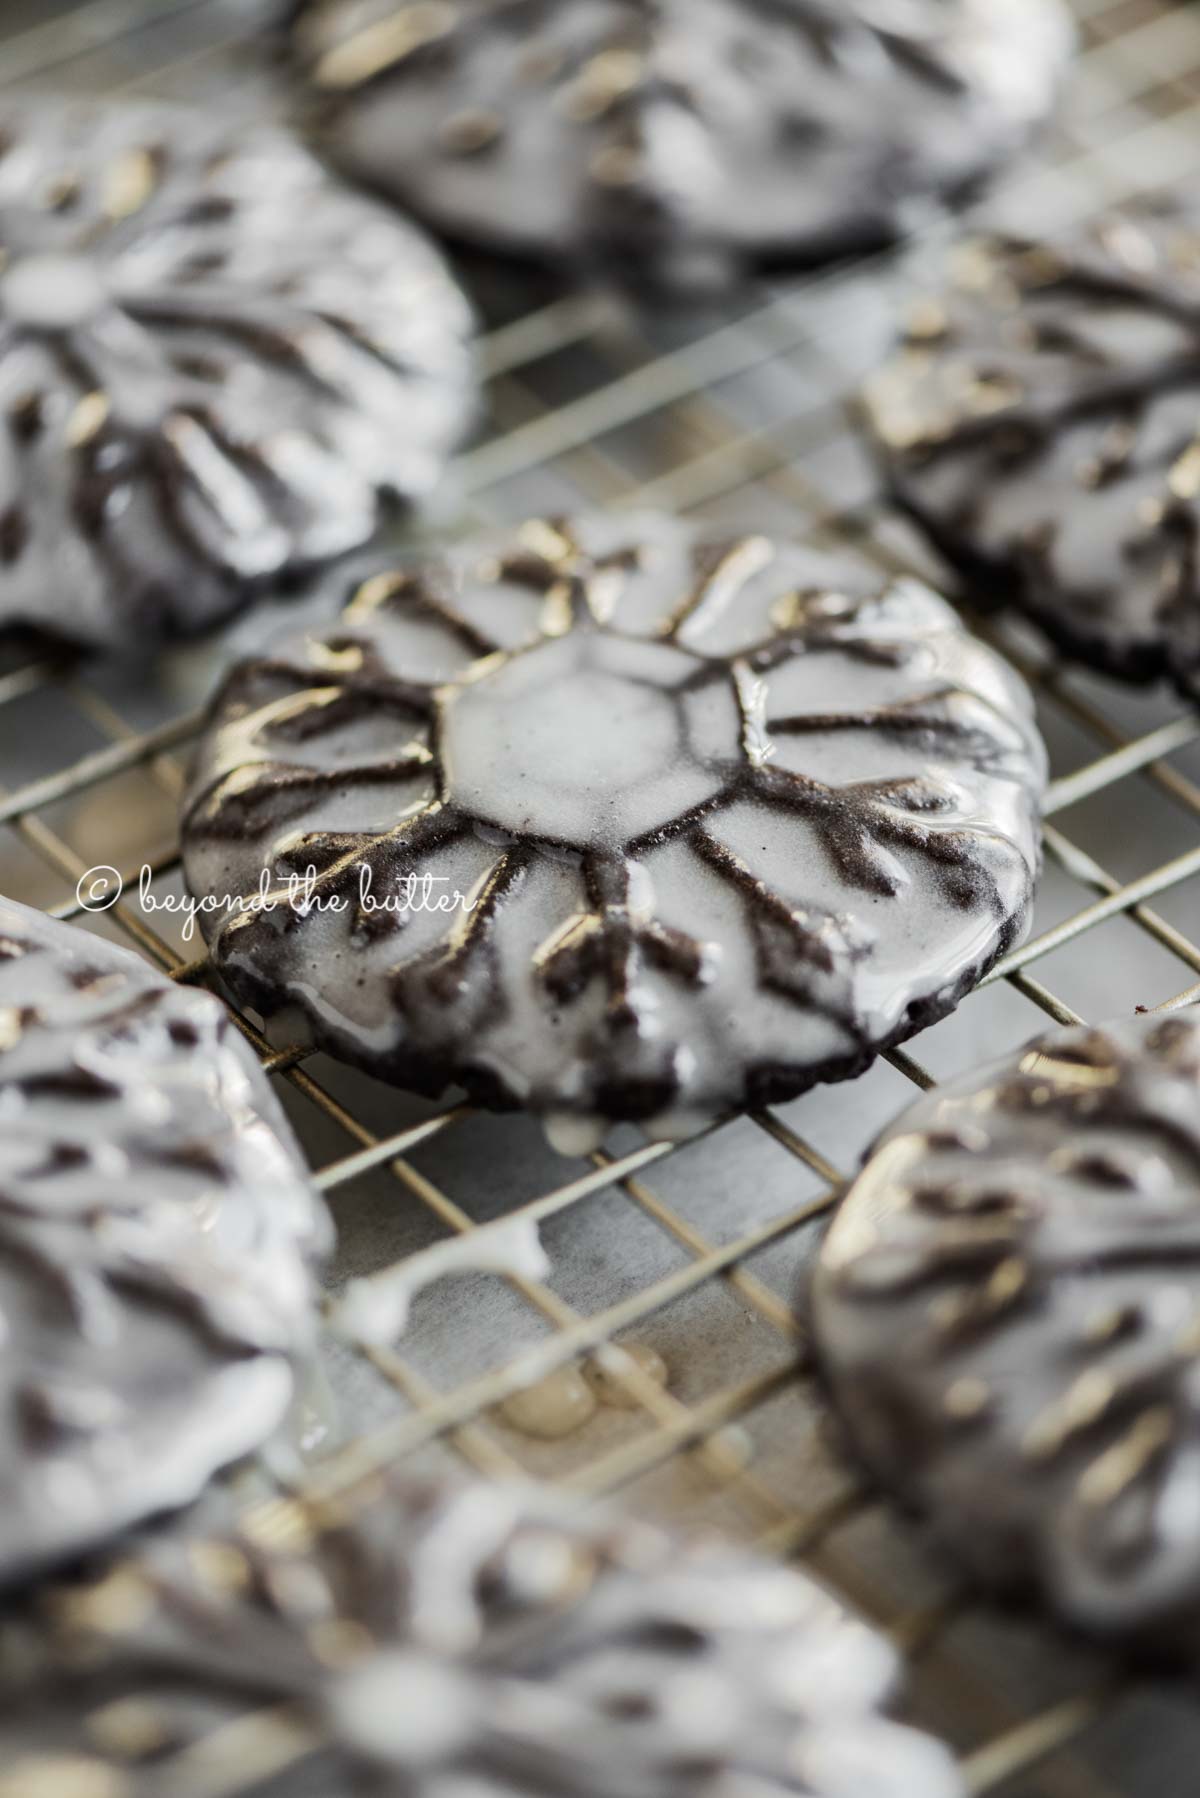
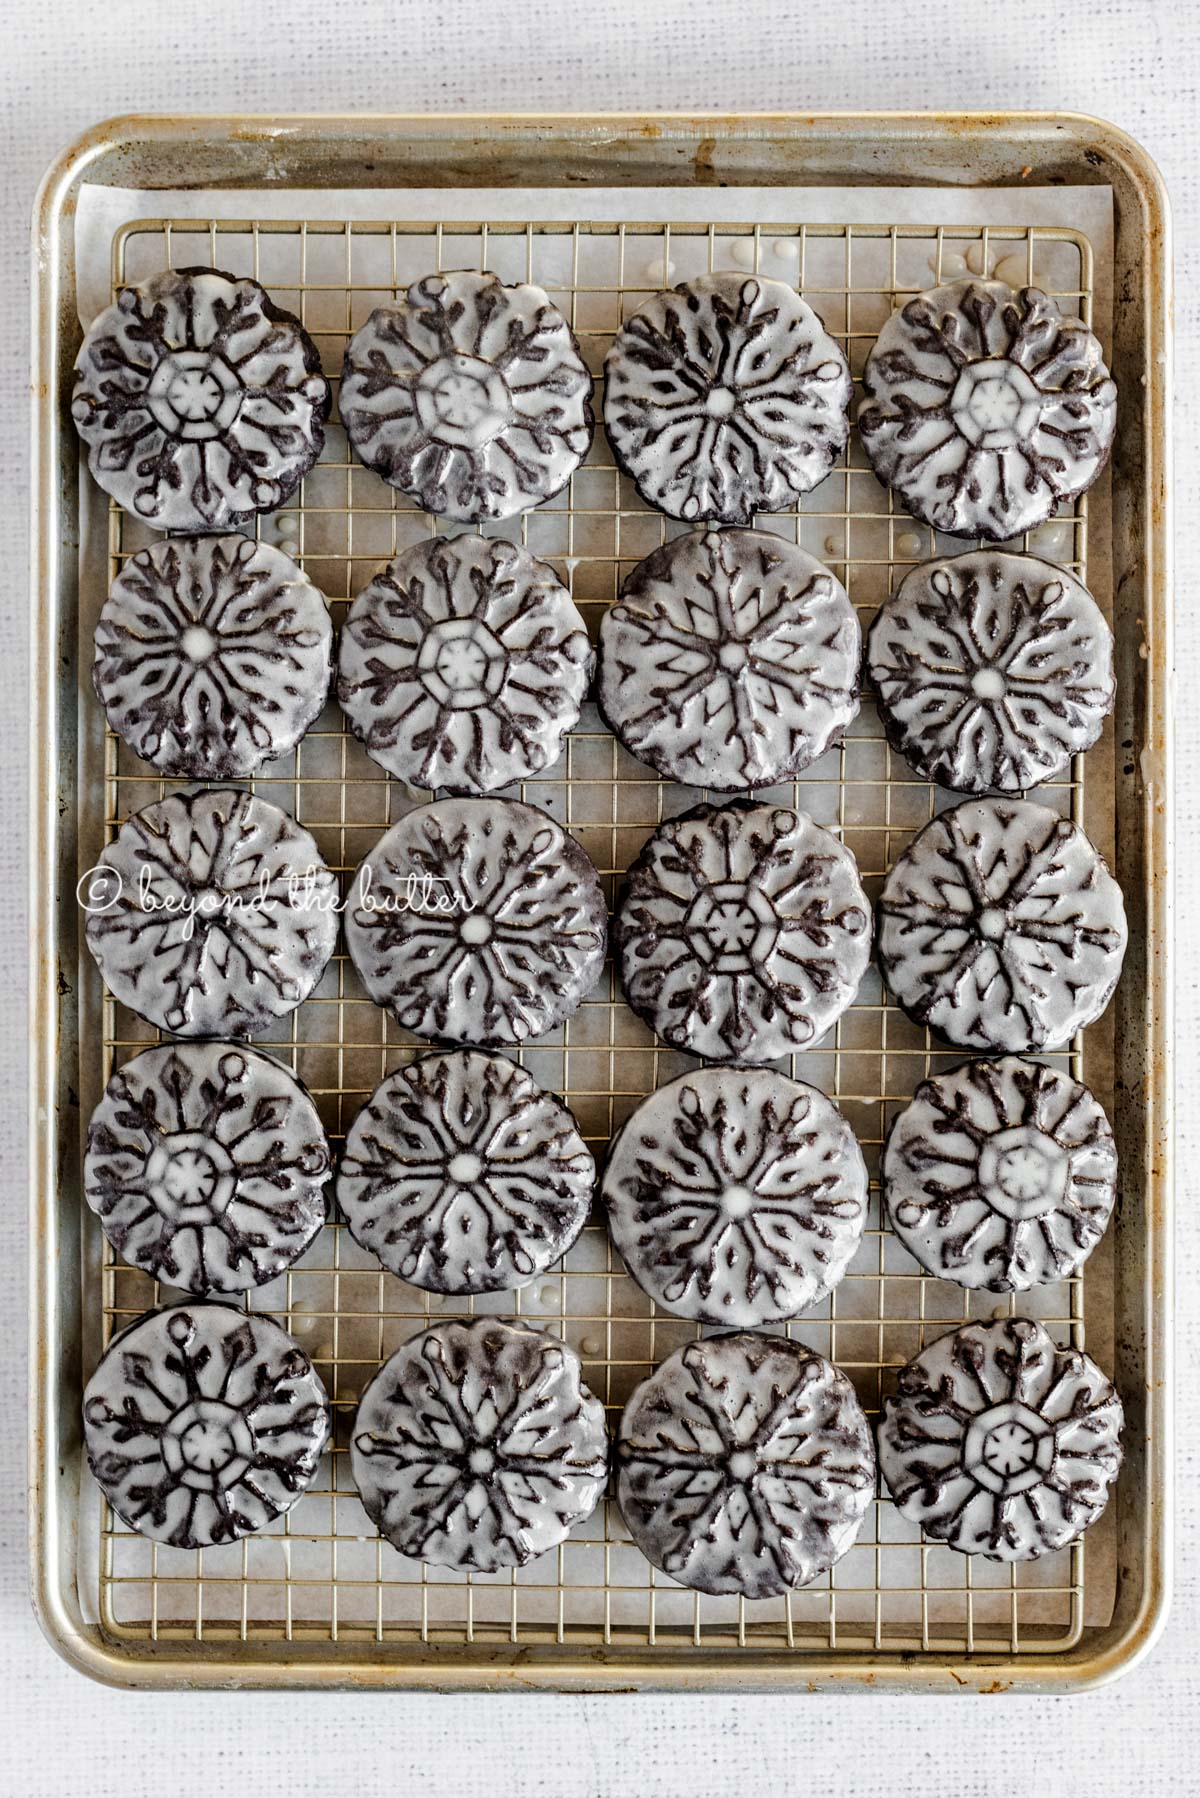
This Homemade Oreo Snowflake Cookie recipe is a spin on the classic Oreo that’s softer, full of a rich, dark chocolate flavor, and dipped in a vanilla bean glaze! They’re absolutely perfect for the holidays or any time of the year with the switch of a different set of cookie stamps!
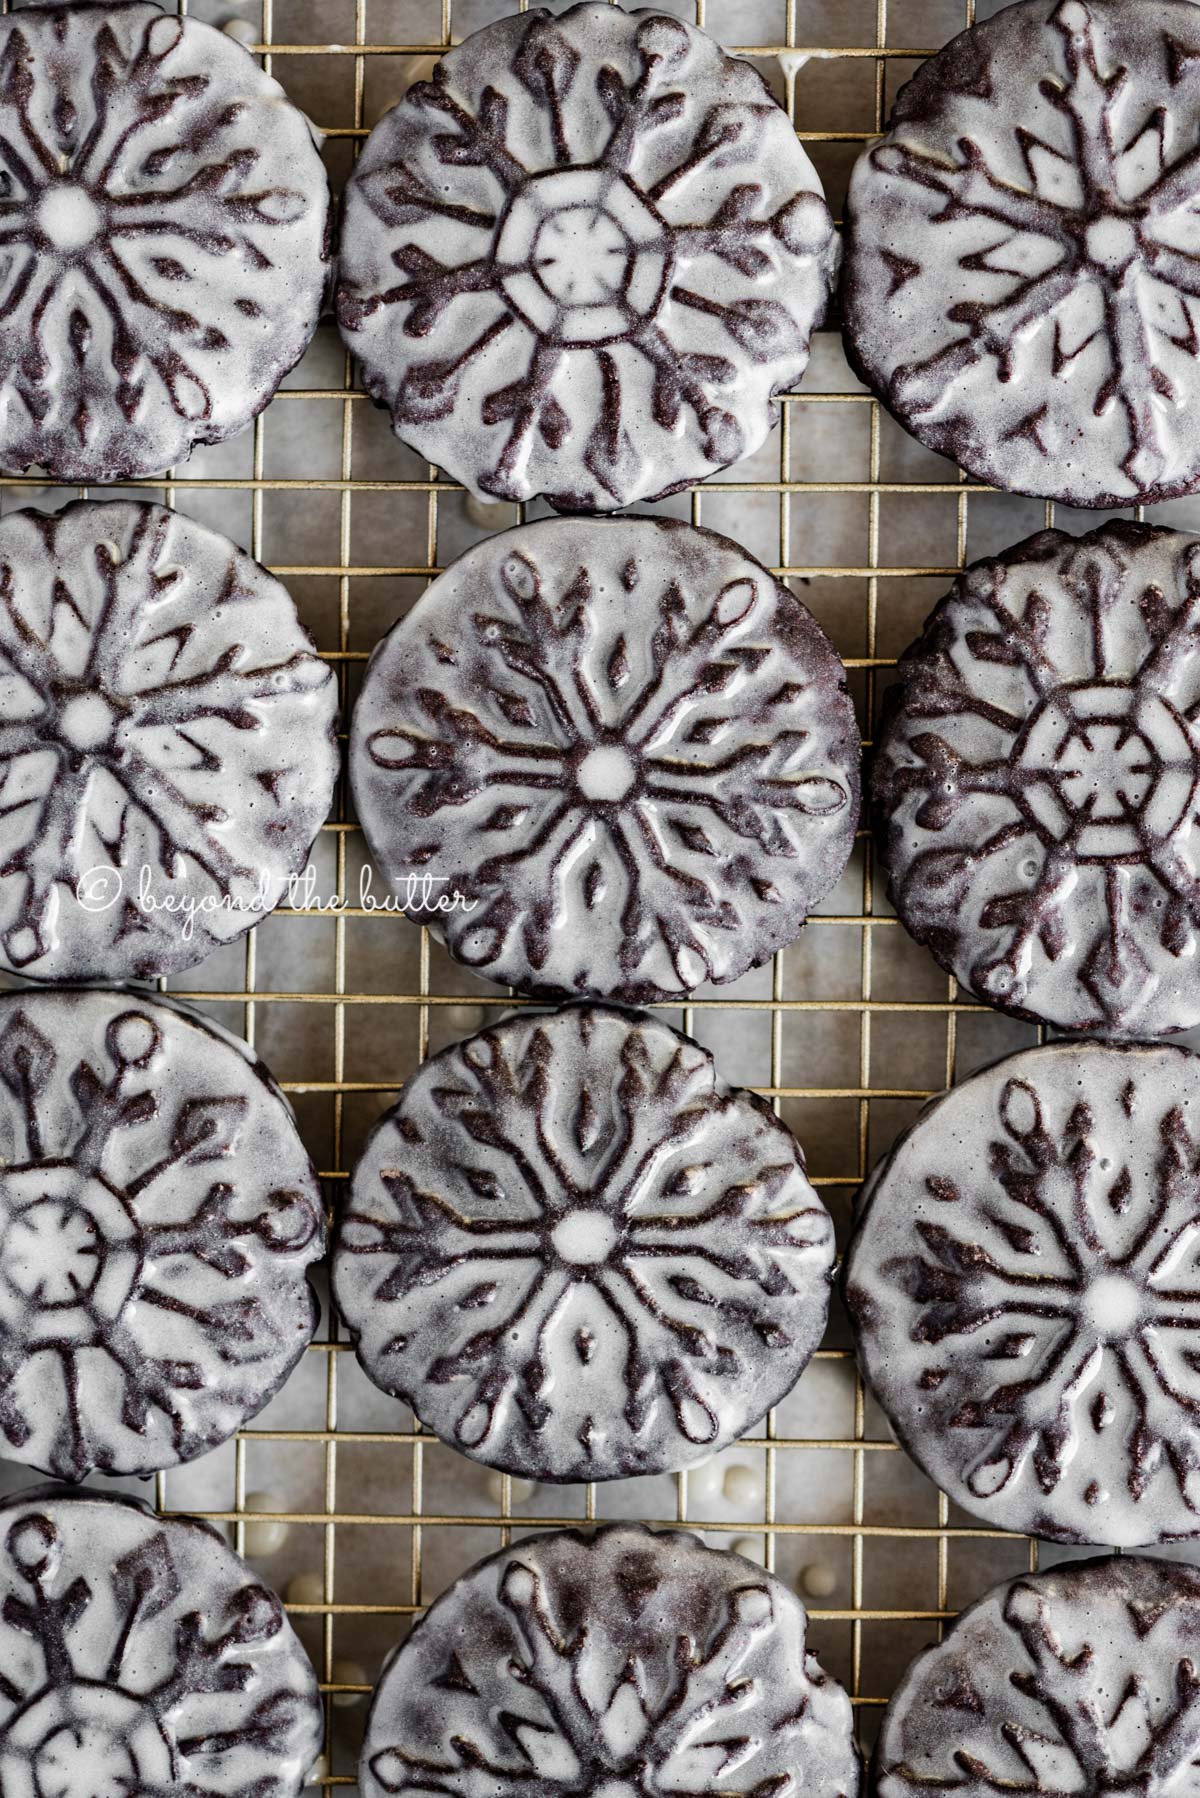
Table of Contents
How to Make Homemade Oreo Snowflake Cookies with Vanilla Bean Glaze
Homemade Oreo Snowflake Cookies
ingredients needed: all-purpose flour, dark chocolate cocoa powder, baking powder, salt, large eggs, unsalted butter, granulated sugar, dark brown sugar*, and Heilala Vanilla’s cocoa vanilla extract*
This homemade oreo snowflake cookie recipe with a vanilla bean glaze is really quite simple to make! You can make them using your handheld mixer, but a stand mixer really works best here because of how thick the dough gets.
Speaking of the dough…a minimum chill time of 1 hour is recommended for this recipe, and another 10-15 minutes of chilling after you’ve stamped out the cookies. The latter recommendation really is optional, but it does help keep the shape of the snowflake pattern! You can do this step right before or while the oven pre-heats.
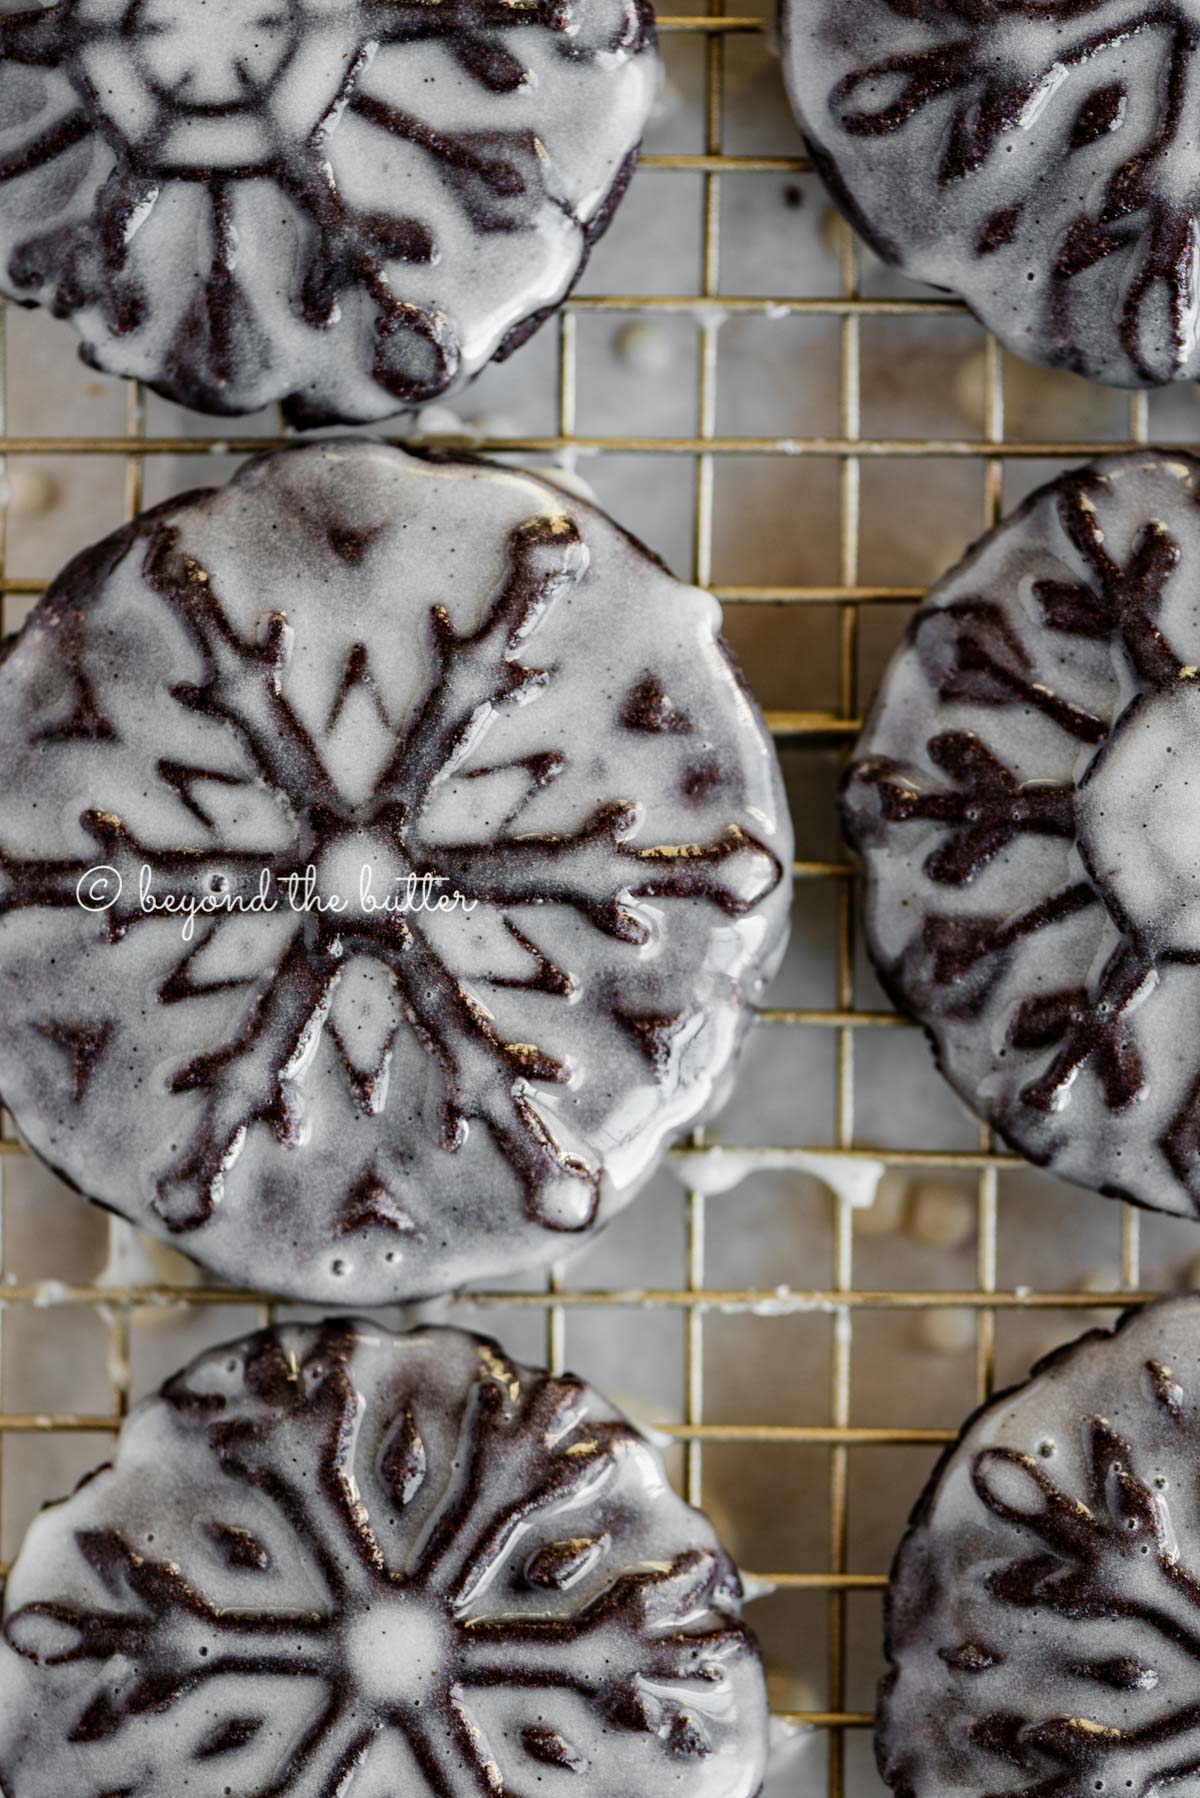
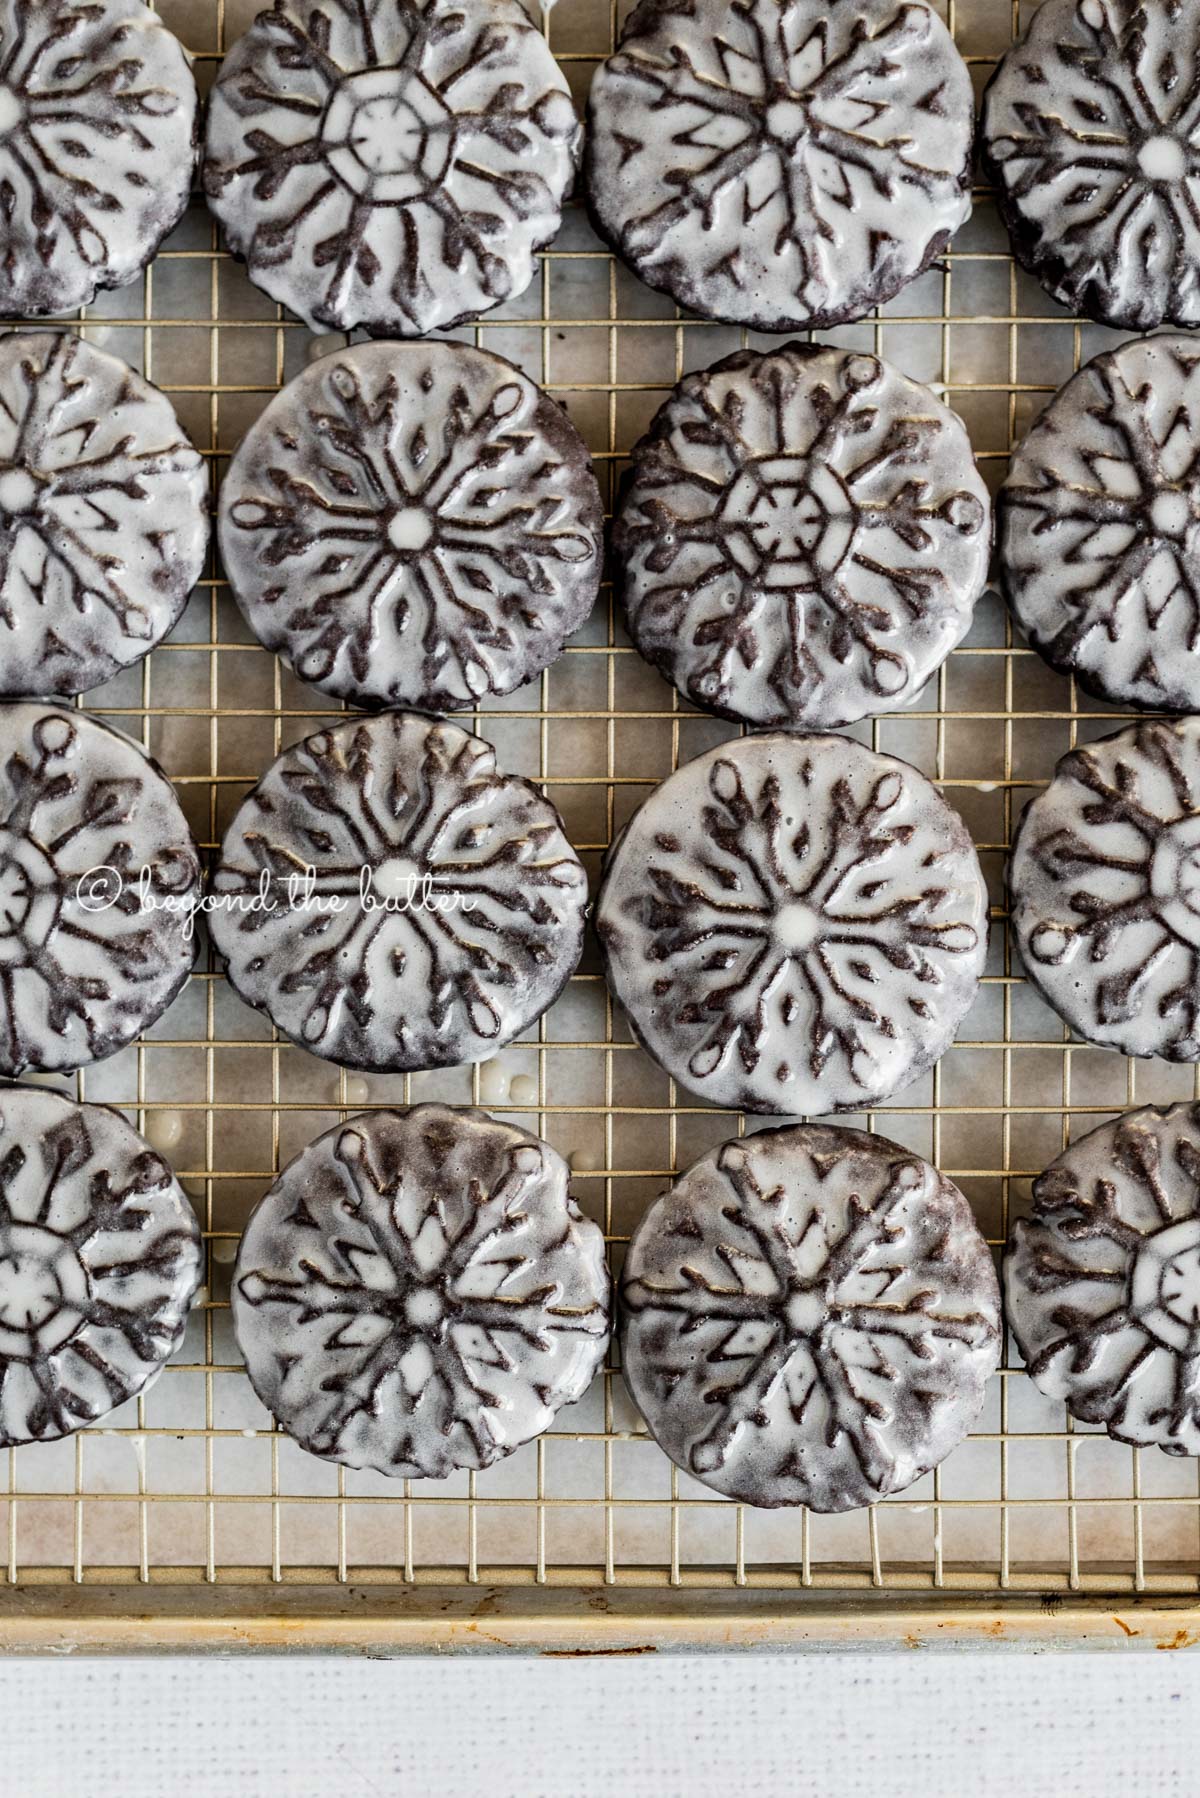
These homemade oreos are softer than the classic, but equally—if not more—rich and chocolatey! They’re not so soft though that they’ll easily fall apart on you. My husband and I absolutely love them with or without the vanilla bean glaze!
* You can substitute the dark brown sugar for light brown sugar and the Heilala Vanilla vanilla extract for regular vanilla extract.
Vanilla Bean Glaze
ingredients needed: sifted confectioners sugar, milk, and vanilla bean paste
You can easily make this vanilla bean glaze in a large mixing bowl using a large whisk. One important step you don’t want to skip is sifting the confectioners sugar.
Why? Because it will help remove any of those pesky lumps that can appear. It will also give you a nice, smooth glaze for your homemade oreo snowflake cookies!
How Do I Use These Cookie Stamps?
These Nordic Ware snowflake cookie stamps are used differently then the cookie cutter or cookie plunger style. Typically you roll out the cookie dough and then stamp or cut out the cookie shape.
For this homemade oreo snowflake cookie recipe, you will roll the cookie dough into roughly 1 1/2-inch size balls. You’ll place each ball onto the cookie sheet, center the ball underneath the flour coated cookie stamp, then evenly press down until the stamp is flush with your surface.
When you pull up, the cookie will either stick to the parchment paper (or silicone baking mat) or it will stick to the cookie stamp. If it sticks to the cookie stamp (which is more than likely will), gently pull it away until it releases.
Featured Baking Tools
Quick Tips Before Starting
- I used the Nordic Ware Frozen 2 Snowflake Cookie Stamp Set for this homemade oreo recipe. Despite never seeing Frozen 1 or the sequel, I can at least say these snowflake cookie stamps are awesome. Of course, I’m a huge fan of all things Nordic Ware! I should probably see both movies though!
- The recommended baking time for this cookie recipe is 325ºF for 12-15 minutes. 14 minutes in my oven worked best, but as always remember to begin checking your cookies at the beginning recommended time.
- The palms of your hands will definitely get dark from the chocolate as you roll the cookie dough into the balls. It easily washes off, but if you’re not a fan of that, you can use disposable kitchen gloves.
- Coating your cookie stamps with flour is an important step you don’t want to skip. Using the flour will help the cookie release from the stamp as you pull up or, and—this is likely to happen—when you have to gently peel it away from the stamp. I had to do this with the majority of my cookies, but they all released easily!
- Like I mentioned above, you can choose to skip chilling the cookies after you’ve stamped them, but they really do help to keep the snowflake patterns as they bake.
- The cookies should cool completely before you dip them into the glaze.
- You can use a different style cookie stamp if you’d like, but depending the style you choose, you may need to roll the dough out beforehand.
Don’t Forget These Holiday Favorites!
- Chocolate Dipped Peanut Butter Cookies – uses the Nordic Ware geo cast cookie stamp set!
- Homemade Snowflake Butter Cookies
- Hot Chocolate Mini Marshmallow Cookies
- Super Soft Cut-Out Sugar Cookies
- Chocolate Thumbprint Cookies
Homemade Oreo Snowflake Cookies

Ingredients
homemade Oreo snowflake cookies
- 2 cup All-Purpose Flour
- 1 cup Dark Chocolate Cocoa Powder, like Hershey's Special Dark
- ½ tsp Baking Soda
- 1 tsp Salt
- 1 cup Unsalted Butter, room temperature
- 3/4 cup Granulated Sugar
- 1/4 cup Dark Brown Sugar, lightly packed
- 2 Large Eggs
- 1 tsp Heilala Vanilla Cocoa Vanilla Extract, or regular vanilla extract
vanilla bean glaze
- 2 cup Sifted Powdered Sugar
- 1 tsp Vanilla Bean Paste
- 4 tbsp Milk, any dairy
Instructions
homemade Oreo snowflake cookies
- In a medium size bowl, whisk together the all-purpose flour, dark chocolate cocoa powder, baking soda, and salt. Set to the side.2 cup All-Purpose Flour, 1 cup Dark Chocolate Cocoa Powder, ½ tsp Baking Soda, 1 tsp Salt
- Using your hand mixer or stand mixer fitted with the paddle attachment, cream together the softened unsalted butter, granulated sugar, and dark brown sugar on medium-high speed until light and fluffy.1 cup Unsalted Butter, 3/4 cup Granulated Sugar, 1/4 cup Dark Brown Sugar
- Add in each egg one at a time until each one is fully incorporated into the dough. Then add in the vanilla extract.2 Large Eggs, 1 tsp Heilala Vanilla Cocoa Vanilla Extract
- Reduce the mixer to low and gradually add in the whisked dry mixture until just combined. The dough will be thick and slightly sticky.
- Cover the dough with plastic wrap and chill in the refrigerator for a minimum of 1 hour. You can also transfer the cookie dough to a tightly sealed storage container to keep in the refrigerator.
- After chilling is complete, line your cookies sheets with parchment paper.
- Have a small bowl of all-purpose flour next to your work area to continually dip your cookie stamps into before stamping. Shake off any excess. Coating your cookie stamps will help release the cookie from the stamp (because they will probably stick).
- Take a spoonful size of cookie dough and roll into a 1 1/2-inch size ball. Place the ball of dough onto the parchment lined cookie sheet, place and center the floured cookie stamp over top, then evenly press down until the stamp is flush with the paper.
- When lifting up, the stamp may release from the cookie. If it does not (which can happen). gently remove the cookie from the stamp starting with one of the edges. Then place the cookie onto the cookie sheet. Space the cookies out about 1 to 2 inches apart.
- Place them into the freezer or refrigerator to chill for about 10-15 minutes. You can do this just before the next step or as you're preheating your oven. Note: this 2nd chilling time is an optional step!
- Adjust your oven rack to the 2nd level mark, pre-heat your oven to 325ºF, then bake the cookies for 12-15 minutes.
- Remove from the oven and allow the cookies to cool on the cookie sheets for about 5 minutes before transferring them to a cooling rack. Let them cool completely before dipping them in the vanilla bean glaze.
vanilla bean glaze
- In a large bowl, whisk together the sifted powdered sugar, vanilla bean paste, and milk until it’s nice and smooth.2 cup Sifted Powdered Sugar, 1 tsp Vanilla Bean Paste, 4 tbsp Milk
- Line a baking sheet with parchment paper with a wire cooling rack fitted over the top. Set to the side of your glaze and cookies.
- Dip the top of the cookie into the glaze then, keeping the cookie over the bowl of glaze, allow any excess to drip off. Place the cookies onto the wire rack/baking sheet to dry.
- Keep the cookies stored in an airtight container at room temperature for up to 1 week.
Notes
- I used the Nordic Ware Frozen 2 Snowflake Cookie Stamp Set for this homemade oreo recipe. Despite never seeing Frozen 1 or the sequel, I can at least say these snowflake cookie stamps are awesome. Of course, I’m a huge fan of all things Nordic Ware! I should probably see both movies though!
- The recommended baking time for this cookie recipe is 325ºF for 12-15 minutes. 14 minutes in my oven worked best, but as always remember to begin checking your cookies at the beginning recommended time.
- The palms of your hands will definitely get dark from the chocolate as you roll the cookie dough into the balls. It easily washes off, but if you’re not a fan of that, you can use disposable kitchen gloves.
- Coating your cookie stamps with flour is an important step you don’t want to skip. Using the flour will help the cookie release from the stamp as you pull up or, and—this is likely to happen—when you have to gently peel it away from the stamp. I had to do this with the majority of my cookies, but they all released easily!
- Like I mentioned above, you can choose to skip chilling the cookies after you’ve stamped them, but they really do help to keep the snowflake patterns as they bake.
- The cookies should cool completely before you dip them into the glaze.
- You can use a different style cookie stamp if you’d like, but depending the style you choose, you may need to roll the dough out beforehand.
Nutrition
Nutritional information provided above is an estimate only and will vary based on specific ingredients used. See Nutritional Disclaimer for more info.


Flavor was great and the stamp pattern baked beautifully, but they came out super dry. I used the metric measurements later realizing the flour, cocoa powder and granulated sugar convert to higher amounts than they should and brown sugar coverts to less. I’m going to try again but convert the US measures myself.
Can you freeze pre-made dough and bake cookies at a later date?
Yes, but I would recommend rolling the dough out and freezing it in between layers of wax paper. This way when you’re ready to bake them it will be easier to cut out with cookie cutters/stamps.
These cookies are very pretty with the glaze. They are going on my cookie trays and I am eager to hear what people think. I think they were delicious and did remind me of an Oreo! Yum!!
Thank you so much for making them!
Help! Making these now, and not sure when to add the vanilla.. after the eggs??
Hi! Yes, it gets added in after the eggs. I corrected the recipe, sorry about that!
Such a great recipe! I just made these cookies and they turned out beautiful AND they taste amazing. Bursting with chocolate flavor in a moist cookie and the matte icing on top is gorgeous! Super easy with fantastic results.