
This Easy Homemade Apple Pie recipe combines a made-from-scratch apple pie filling that’s baked in my signature buttery, flaky pie crust. It tastes fantastic and absolutely perfect for those crisp fall nights!
Pin this now to find it later
Pin ItThe number one recipe that always makes me think of the Fall season and Thanksgiving, besides my Pumpkin Pie, Pumpkin Pie Cake Bars, Brown Sugar Sweet Potato Pie, and Homemade Cherry Pie recipes, is apple pie! And this homemade apple pie recipe will knock your socks off!
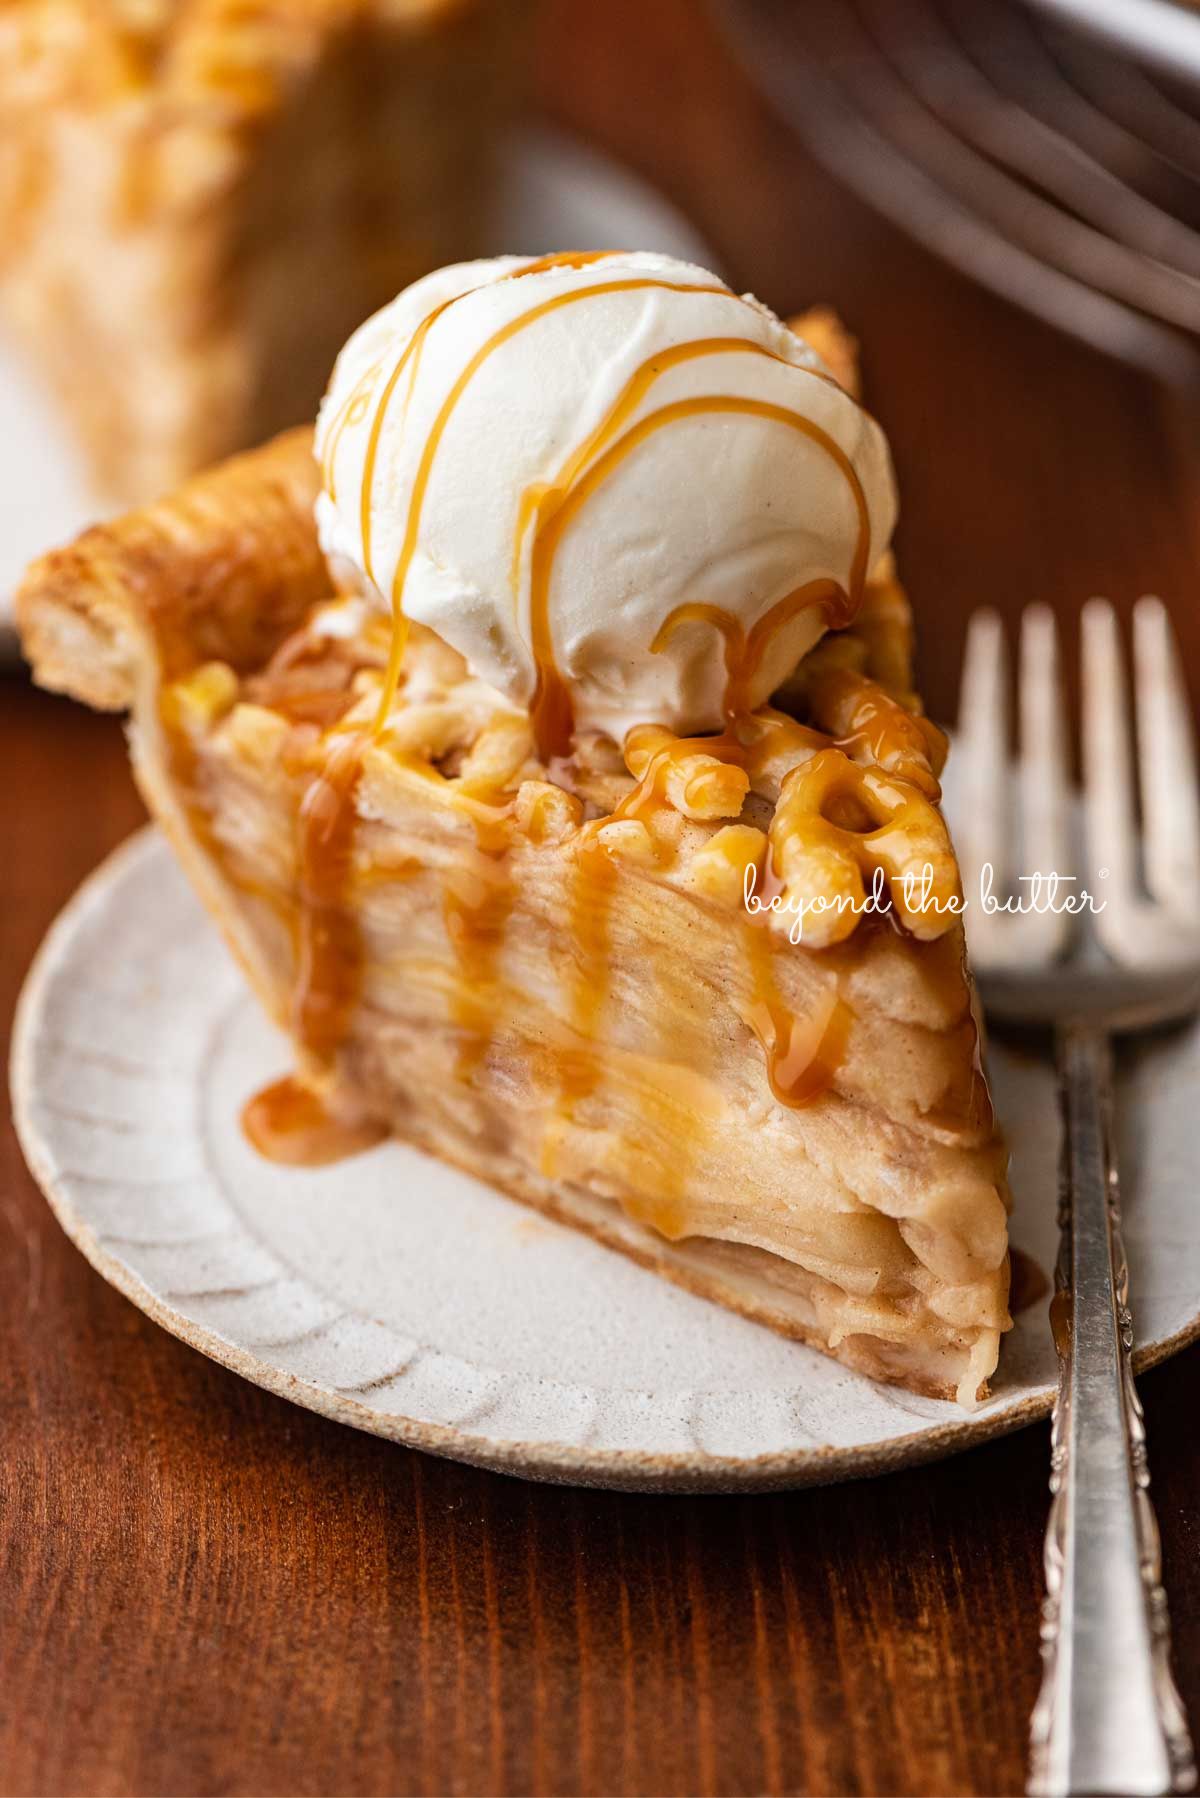
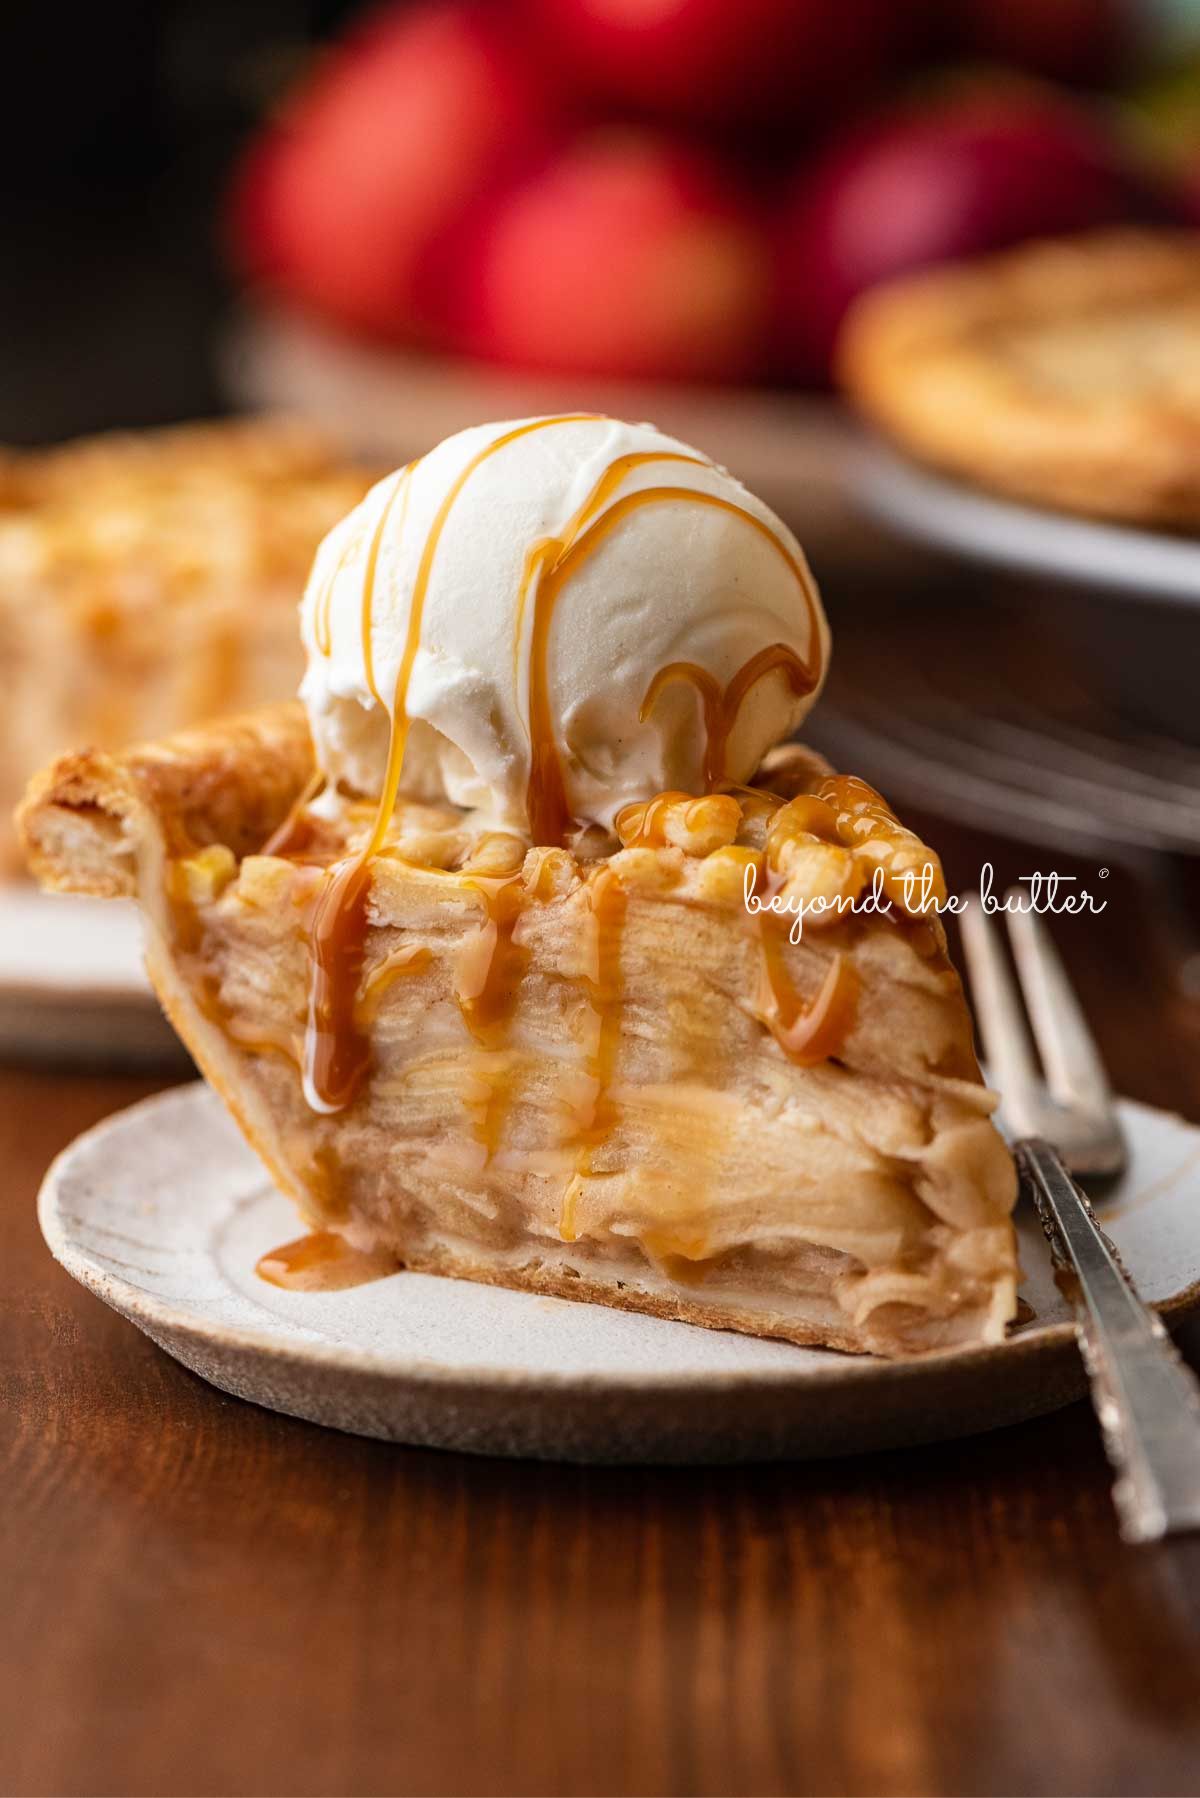
Each slice brings the warmth of the season front and center with flavors of apple, cinnamon, and nutmeg in every bite, reminding you just why this recipe is an eternal fall favorite. And for the ultimate fall comfort treat, top off your slice of apple pie with a generous scoop of vanilla ice cream!
If you’re looking for more apple-flavored favorites, check out my Apple Coffee Cake and Apple Cinnamon Streusel Muffins!
Table of Contents
Ingredients
The ingredients below are used to make this easy homemade apple pie recipe. Items noted in the bulleted list are key ingredients that needed a bit more explanation.

- Apples. My favorite apples when making apple pie from scratch are Granny Smith apples or a combination of Granny Smith with McIntosh or Gala apples. You can also use Honeycrisp or Golden Delicious apples.
- Lemon Juice. Lemon juice prevents oxidation or browning of apples. You can use bottled or fresh lemon juice. As a substitute, you can use lime juice.
- Light Brown Sugar. My favorite brand of light brown sugar is from ALDI because it smells heavenly, but Trader Joe’s is another good one to try!
- Cinnamon. I’ve been using Indonesian cinnamon from King Arthur Baking, and I love it. It’s a sweeter, milder version, perfect for baking in recipes like this apple pie!
For quantities and instructions, please see the recipe card below.
How to Make The Recipe
Below is a brief overview of how to make this homemade apple pie from scratch. For the full printable recipe, which can be made using US customary or metric measurements, visit the recipe card below.
Recipe Tip: You can skip this part if you plan to use store-bought refrigerated pie crusts.

Step 1. Make the pie crusts. Mix the all-purpose flour, salt, cold cubed butter, and cold shortening with a pastry blender until pea-sized pieces form (Images 1 and 2). Add in the ice-cold water a tablespoon at a time until the pie dough forms (Image 3). Double-wrap each pie crust disc in plastic wrap (Image 4) and place it in the back of your refrigerator for at least one hour. Refrigerated pie crusts will last between 3-5 days.
Recipe Tip: If you are making the pie crusts with the intent of having them on hand for pie season, I recommend tightly double-wrapping the discs with plastic wrap, placing them into a freezer bag, and then into the freezer. They will be good for up to a month.

Recipe Tip: Making the apple pie filling isn’t required, but it truly helps produce the best apple pie!
Step 2. Pre-cook the apple pie filling. Whisk together the sugars, cinnamon, nutmeg, and salt (Image 5). In a large skillet over medium heat, melt the butter, then add the sliced apples to coat (Image 6). Reduce the heat to low, cooking the apples for about 5 minutes or until they begin to soften. The apples will also reduce in size. Stir in the all-purpose flour, cornstarch, and lemon juice until the apples are fully coated (Image 7). Transfer the pie filling to a large glass bowl to cool completely (Image 8) before adding it to the pie crust.

Recipe Tip: Preheat the oven with a jelly roll pan or cookie sheet on the rack. This does a great job of getting the bottom crust to start baking before the pumpkin pie filling has a chance to make things soggy.
Step 3. Assemble the pie, then bake! Take out your chilled pie crust and roll it to 12-14 inches in diameter (Image 9). Add the apple pie filling to the pie crust, then add your top crust (Images 10 and 11). Crimp the edges, then apply an egg wash to the lattice top (Image 12). Bake for 15 minutes at 425ºF. Reduce to 350ºF and bake for an additional 30-35 minutes. Add a pie crust shield with 15-20 minutes remaining to prevent your crust from over-browning.
Precooked Apple Pie Filling
While it is not a requirement for making this homemade apple pie recipe, I do highly recommend precooking your apple pie filling for the following reasons:
Eliminates Pie Juices. It can help eliminate some of the pie juices that tend to bubble up and run over the pie crust while baking. It’s worth noting that having a well-vented pie crust top can help with this part as well.
Softens the Apples. Precooking the filling will soften and settle the apples ahead of time so you’re not left with any potential crunchiness or gaps. And, you want the apples softened, but not to the point where they fall apart into a mushy mess.
Thicker Pie Filling. It can produce a thicker, more solid pie. Apples lose volume during baking, which can create gaps between the filling and the crust. Precooking the apple pie filling reduces the chance of this happening.
Helpful Pie-Making Tips
- If you deal with arthritis in your hands as I do, you can use a food processor to make the pie dough. I found it easier, though, to move the dough to a large, lightly floured mixing bowl to add in the cold water before forming the discs, but that’s up to you. You may find you use a little less water when adding it to the food processor.
- Chill the pie crust for at least 1 hour. Overnight is my preference!
- Roll out your bottom pie crust, create your pie crust edge, and refrigerate again.
Recipe FAQs
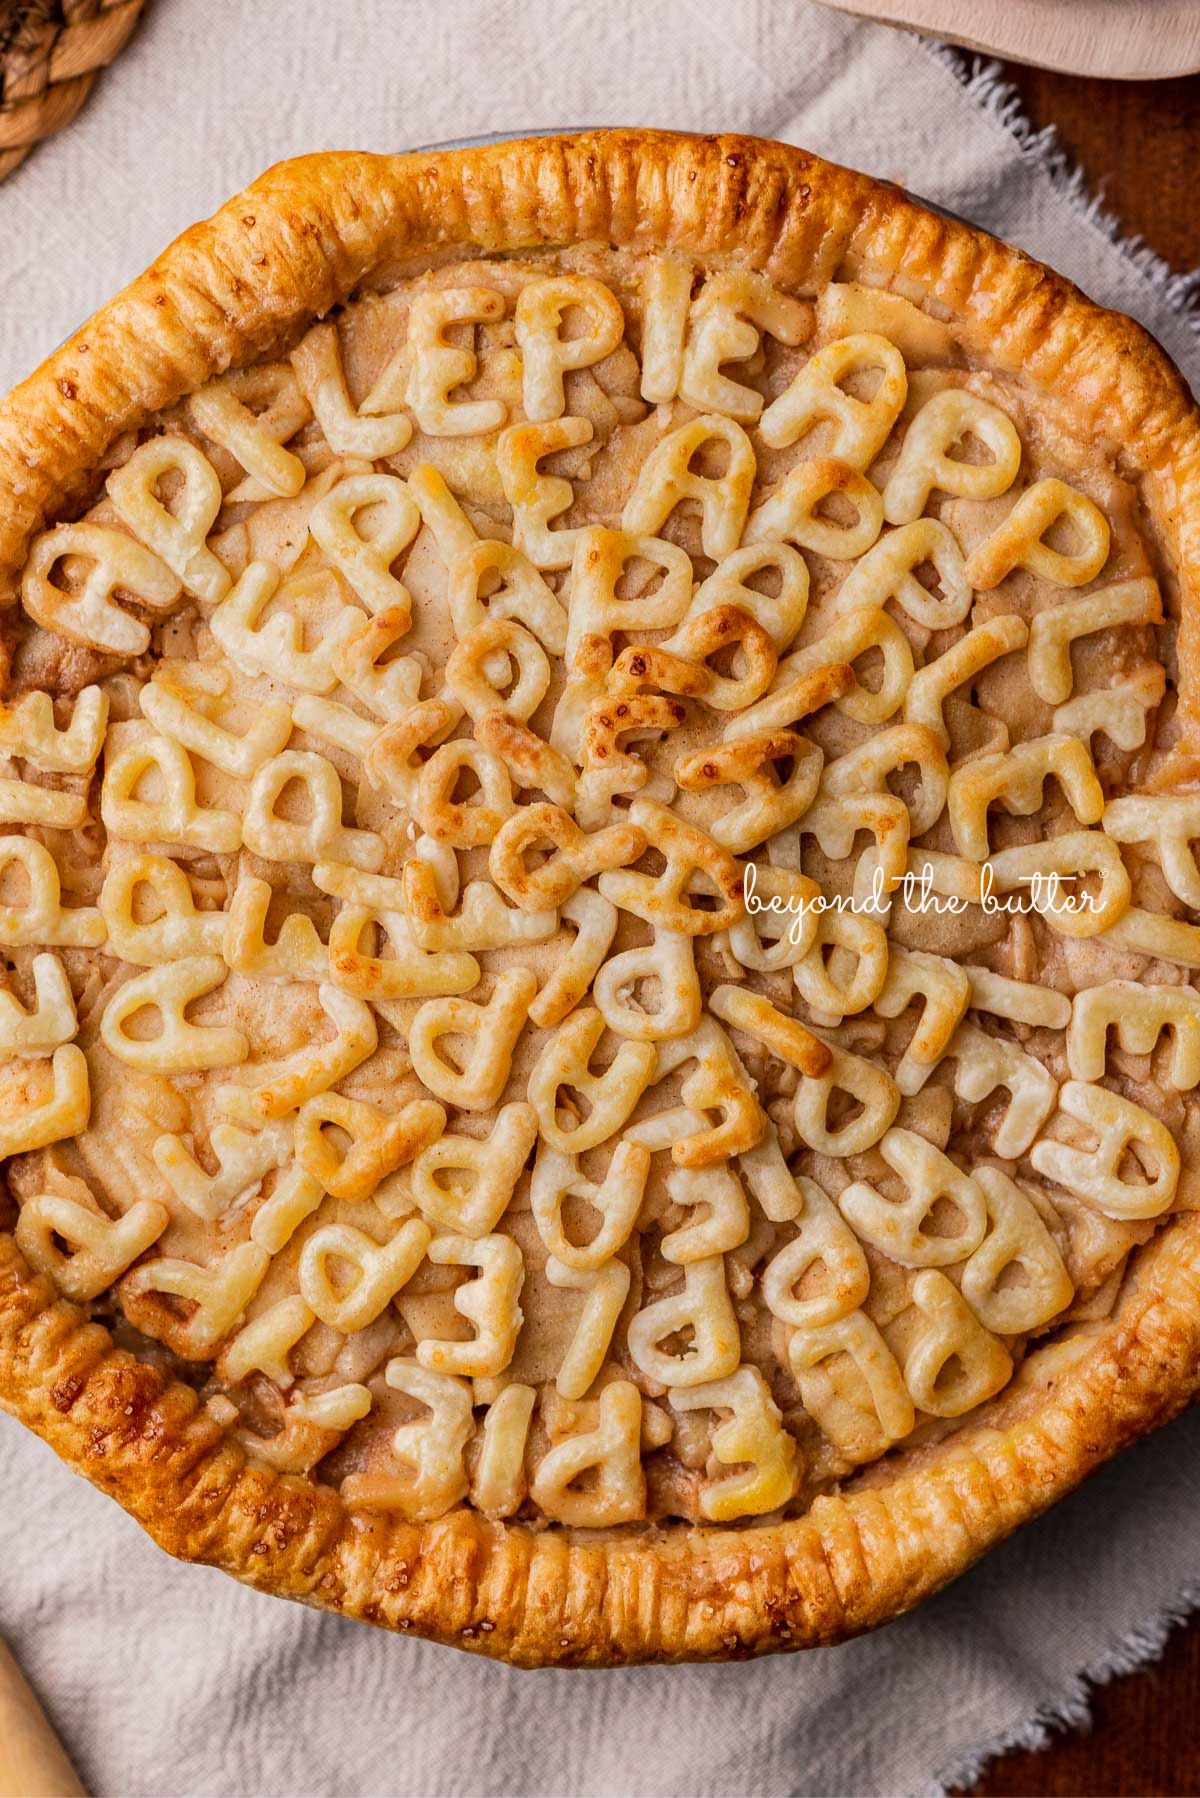
I used these 1-inch Ateco alphabet cutters to spell out “APPLE PIE” for my top pie crust design. I recommend using chilled pie crust dough and a cookie cutter dipped in a little flour.
To help release the dough from the cutter, you can use a toothpick or pairing knife. I also recommend having a little patience, especially when using the 1-inch alphabet cookie cutters.
For another top pie crust design, you can easily create a cut-out pattern using a cookie cutter (see my Homemade Cherry Pie recipe). You can also create a lattice top with overlapping rows of the pie dough. Cutting slits into a rolled-out pie crust is the simplest way to go though.
Yes, absolutely! You will need one pack of 2 pie crusts, which can be found in the dairy aisle, along with cookie dough, yogurt, butter, etc. I recommend letting the pie crust come to room temperature before you try to unroll it. You will also need to roll out the pie crusts to about 12-14 inches in diameter.
Yes! Once cooled, you can refrigerate it in an airtight container for up to a week or the freezer for up to 3 months.
My personal preference is to slice them almost as thin as potato chips using a mandoline slicer. With thin slices of apples, you will want to make sure they don’t turn into a mushy mess. Be gentle when stirring them as you make the apple pie filling.
You can, of course, make the slices thicker using a mandoline slicer or by hand if you prefer. If you use the mandoline slicer, I recommend getting yourself a pair of cut-resistant gloves. I just recently bought a pair, and they have definitely helped save my fingertips!
More Delicious Pie Recipes


If you tried this Homemade Apple Pie Recipe or any other recipe on my website, please leave a 🌟 star rating and let me know your thoughts in the 📝 comments below. Thanks for visiting!
The BEST Homemade Apple Pie

Ingredients
Homemade Pie Crusts (makes 2, 9-inch pie crusts)
- 2 cups All-Purpose Flour
- 1 tsp Salt
- 6 tbsp Unsalted Butter, cold and cut into cubes
- 1/2 cup Vegetable Shortening, cold and cut into cubes
- 4-6 tbsp Ice Cold Water
Apple Pie Filling
- 3 tbsp Unsalted Butter
- 2 1/2 lbs Apples, peeled, cored, and sliced into thin wedges
- 1/2 cup Light Brown Sugar, lightly packed
- 1/4 cup Granulated Sugar
- 1 tsp Cinnamon
- 1/2 tsp Nutmeg
- 1/4 tsp Salt
- 2 tbsp All-Purpose Flour
- 1 tbsp Cornstarch
- 1 tbsp Lemon Juice
Egg Wash
- 1 large Egg Yolk, lightly whisked (for pie crust shine)
- 1 tbsp Water
Instructions
Homemade Pie Crust – Part 1
- You can skip this part if buying store-bought refrigerated pie crusts.
- In a large mixing bowl and using a pastry blender (or two forks), mix together the all-purpose flour, salt, cold cubed butter, and cold vegetable shortening until you have small pea-size pieces. Some larger pea-size pieces are fine too!2 cups All-Purpose Flour, 1 tsp Salt, 6 tbsp Unsalted Butter, 1/2 cup Vegetable Shortening
- Add in 1 tablespoon of the ice-cold water, then (using a spatula or with your hands) work it into the pie dough mixture. Continue to add the ice-cold water, 1 tablespoon at a time, until the pie dough forms and is no longer crumbly. If there are any crumbly bits, just add the teeny tiniest bit of cold water so they blend in with the rest of the dough.4-6 tbsp Ice Cold Water
- After forming the ball of pie dough, place it on a lightly-floured, clean surface and divide it in half using a pastry cutter. Pat each half into a 1″- 1 1/2″ thick disc, then double wrap it tightly in plastic wrap and place them in the coldest part of your refrigerator (usually the back) for a minimum of 1 hour.
Apple Pie Filling
- In a medium-size bowl, whisk together the light brown sugar, granulated sugar, cinnamon, nutmeg, and salt. Set aside.1/2 cup Light Brown Sugar, 1/4 cup Granulated Sugar, 1 tsp Cinnamon, 1/2 tsp Nutmeg, 1/4 tsp Salt
- In a large skillet over medium heat, melt the unsalted butter then add in the apple slices and stir to coat. Add in the whisked mixture, stirring to combine.2 1/2 lbs Apples, 3 tbsp Unsalted Butter
- Reduce the heat to low and continue to cook the apples for about 5 minutes, gently stirring them until they begin to soften. Be careful not to over cook them or stir the filling too aggressively to avoid breaking the apple slices apart.
- Add the all-purpose flour, cornstarch, and lemon juice over the mixture and stir just a few more times to make sure the sliced apples are full coated.2 tbsp All-Purpose Flour, 1 tbsp Cornstarch, 1 tbsp Lemon Juice
- Remove the apple pie filling from the heat and carefully spoon it into a large bowl to cool completely.
Homemade Pie Crust – Part 2
- While the apple pie filling cools, roll out the first pie dough disc to about 11-12 inches in diameter onto a clean and lightly floured surface.
- Place into the 9 inch pie plate, then trim the edges, leaving about 1/2 inch to fold under.
- Place the pie plate with the pie dough into either the freezer (preferred) or the refrigerator to allow the pie crust to firm, then roll out the second disc of pie dough which will be for the top pie crust.
Assembling the Apple Pie
- Adjust the oven rack to the middle of your oven, set the jelly roll pan or cookie sheet on the rack, and preheat the oven to 425ºF.
- Remove the pie plate from the freezer or refrigerator, gently scoop and arrange the apple pie filling into the crust, then top with the 2nd layer of pie crust. Press the two pie crust edges together then trim to cut off any excess. Crimp the edges using your fingers or a fork dipped in a little flour (so it doesn’t stick to the pie dough), then cut a few slits across the top of the pie.
- With a pastry brush, lightly brush the egg wash over the top of the pie. You won’t need to use all of this on the pie—just a little coverage will be good. Open the oven, place the pie on top of the preheated jelly roll pan or cookie sheet, and bake for 15 minutes at 425ºF.1 large Egg Yolk, 1 tbsp Water
- After 15 minutes, decrease the oven temperature to 350ºF and bake for an additional 30-35 minutes or until the top of the pie is a nice golden brown. At the 15 minute mark, it would be a good idea to add a pie crust shield to avoid burning your pie crust edges. You can use something like the one I have or you can simply use pieces of aluminum foil to place around the edges. I would suggest wearing some oven mitts for this part so you don't accidentally burn your fingers!
- Once the apple pie is done, remove from oven and allow it to cool completely.
Video
Notes
- Chill the pie crust for a minimum of 1 hour. Overnight is my preference!
- Roll out your bottom pie crust, create your pie crust edge and refrigerate again.
- Instead of homemade pie crust you can use store-bought. I recommend letting the pie crust come to room temperature before you try to unroll it. You will also need to roll out the pie crusts to about 12-14 inches in diameter.
- I used these 1 inch Ateco alphabet cutters to spell out “APPLE PIE” for my top pie crust design. I recommend using chilled pie crust dough and cookie cutter dipped in a little flour.
- To help release the dough from the cookie cutter, you can use a toothpick or pairing knife. I also recommend having a little patience, especially when using the 1 inch alphabet cookie cutters.
- Once the apple pie has cooled, you can refrigerate it in an airtight container for up to a week or the freezer for up to 3 months.
Nutrition
Nutritional information provided above is an estimate only and will vary based on specific ingredients used. See Nutritional Disclaimer for more info.


HI there–this looks so good! I may have missed it, but is this a Deep Dish pie? The pic of the single slice looks tall/deep to me, so I thought I would check—thanks so much!
Hi! It’s not, just looks that way I think because of how thin I sliced the apples and the angle I photographed the pie at.
In the words of my 11-year-old cousin who is extremely passionate about his apple pie:
“this is the best apple pie ever!” ~ Elliott
I personally though it was delicious as well! I also had some fun playing around with the top crust design 😉
Great recipe Jennifer!
Aw, this made my day reading this comment—thank you! I’m glad you had fun playing around with the top crust design too!
Making it tonight!
Yay! This makes me super happy! I hope you love it as much as my husband and I did!
I just loooove the presentation – those letters make it perfect for a special occasion (as well as a cozy weekend in). Thanks for sharing, gorgeous photography!
Thank you so much! I’m so happy with how well it came out!